
Most WordPress plugins are distributed in English, and many of them ship without a translation for your language. If you are building a site for a client who does not read English, that leaves you with buttons, form labels, error messages, and admin screens in the wrong language.
A multilingual plugin does not solve this. Polylang, WPML, and TranslatePress translate the content you write, meaning posts, pages, categories, and menus. They do not touch the strings that are written into the source code of your themes and plugins.
Loco Translate does. It is a free plugin with more than a million active installations that lets you edit translation files directly in the WordPress admin, without leaving the browser and without touching the file system.
In this guide I will cover the complete process: creating a translation, choosing a file location that survives updates, using automatic translation with OpenAI, importing files produced elsewhere, and keeping everything in sync when a plugin is updated.
If you prefer a video, the same procedure is available on our YouTube channel:
What Loco Translate Actually Does
WordPress handles translation through Gettext, the same system used by a large amount of open source software. Understanding the three file formats involved makes the rest of this guide easier to follow.
- POT files are templates. They contain the original English strings extracted from the source code, with no translations. A plugin author generates one and ships it with the plugin.
- PO files are the editable translations. One per language, containing each source string paired with its translation.
- MO files are the compiled binary versions of the PO files. This is what WordPress actually loads at runtime.
Loco Translate gives you a visual editor for PO files and compiles the MO file automatically every time you save. Without it, the usual workflow involves a desktop application such as Poedit and an FTP client.
Step 1: Install Loco Translate
Go to Plugins → Add New Plugin, search for Loco Translate, then install and activate it. A new Loco Translate entry appears in the admin sidebar with sections for translating Themes, Plugins, and the WordPress core.
Step 2: Select the Plugin to Translate
Open Loco Translate → Plugins and select the plugin you want to translate. In this tutorial I use Hreflang Manager, one of our own plugins, because it has no Italian translation and a client needed one.
The screen that opens lists every translation file that exists for that plugin, with a progress bar for each language and a Folder column that tells you where the file lives. If the plugin has no translations yet, the list is empty.
Step 3: Create the Translation and Choose a Safe Location
Click New language. Two choices appear on this screen, and the second one is the most important decision in this entire guide.
First, select your language. The dropdown lists the languages WordPress knows about, and you can type a locale code manually if yours is missing.
Then choose where the file will be saved. Loco Translate offers three locations:
- Author saves inside the plugin’s own folder, in
wp-content/plugins/<plugin>/languages/. Only use this if you are the plugin author. Any plugin update will overwrite or delete what you put here. - System saves to the global WordPress language directory at
wp-content/languages/plugins/. This location is managed by the WordPress translation updater, which can replace your file without warning. - Custom saves to Loco Translate’s own protected folder at
wp-content/languages/loco/plugins/. WordPress updates never touch this directory.
Choose Custom. This is the only location that is safe from updates, and it also takes priority over the other two when WordPress loads translations.
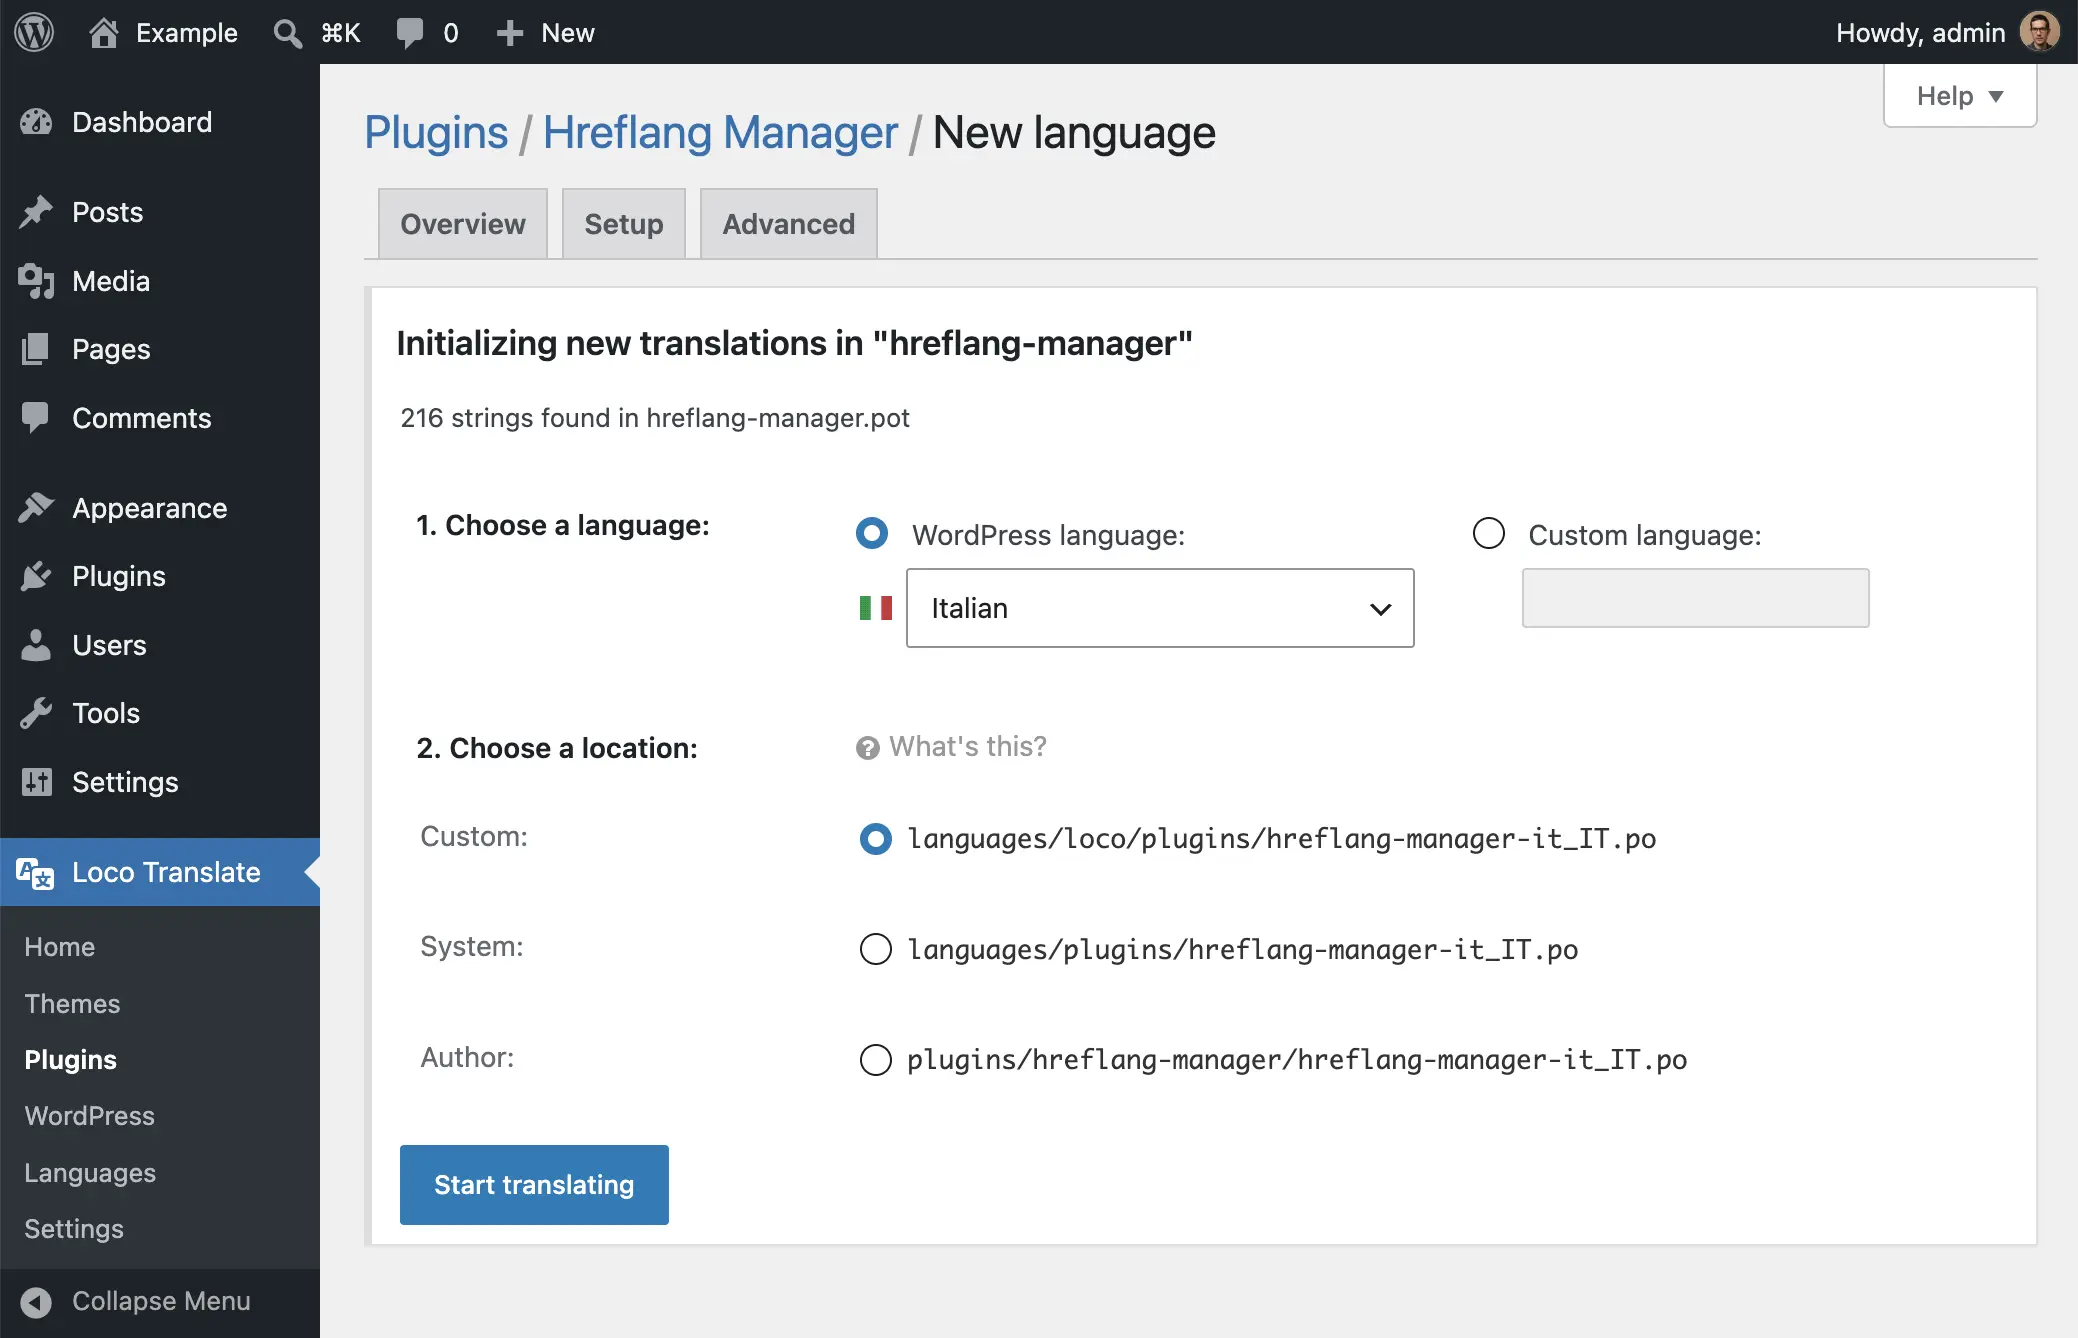
Click Start translating to create the file and open the editor.
How the Loading Order Works
This is worth understanding because it explains why the Custom location is the right answer even when a translation already exists.
When a plugin asks WordPress for its translations, WordPress tries the System location first, then the Author location. Loco Translate inserts its own Custom folder ahead of both, so your file is always loaded first.
More usefully, Loco Translate deliberately lets WordPress continue loading the System or Author file afterwards, and the two are merged. Your strings take priority, and anything you did not translate falls back to the original file. This is what makes it practical to override a handful of strings in an existing translation without recreating the whole file.
Step 4: Translate the Strings
The editor is split into panes. The top pane lists every translatable string in the plugin, sorted alphabetically. Untranslated strings appear in bold blue, and fuzzy strings, meaning translations flagged for review, appear in brown.
Select a string and its English source text appears in the middle pane, with the field for your translation below it.
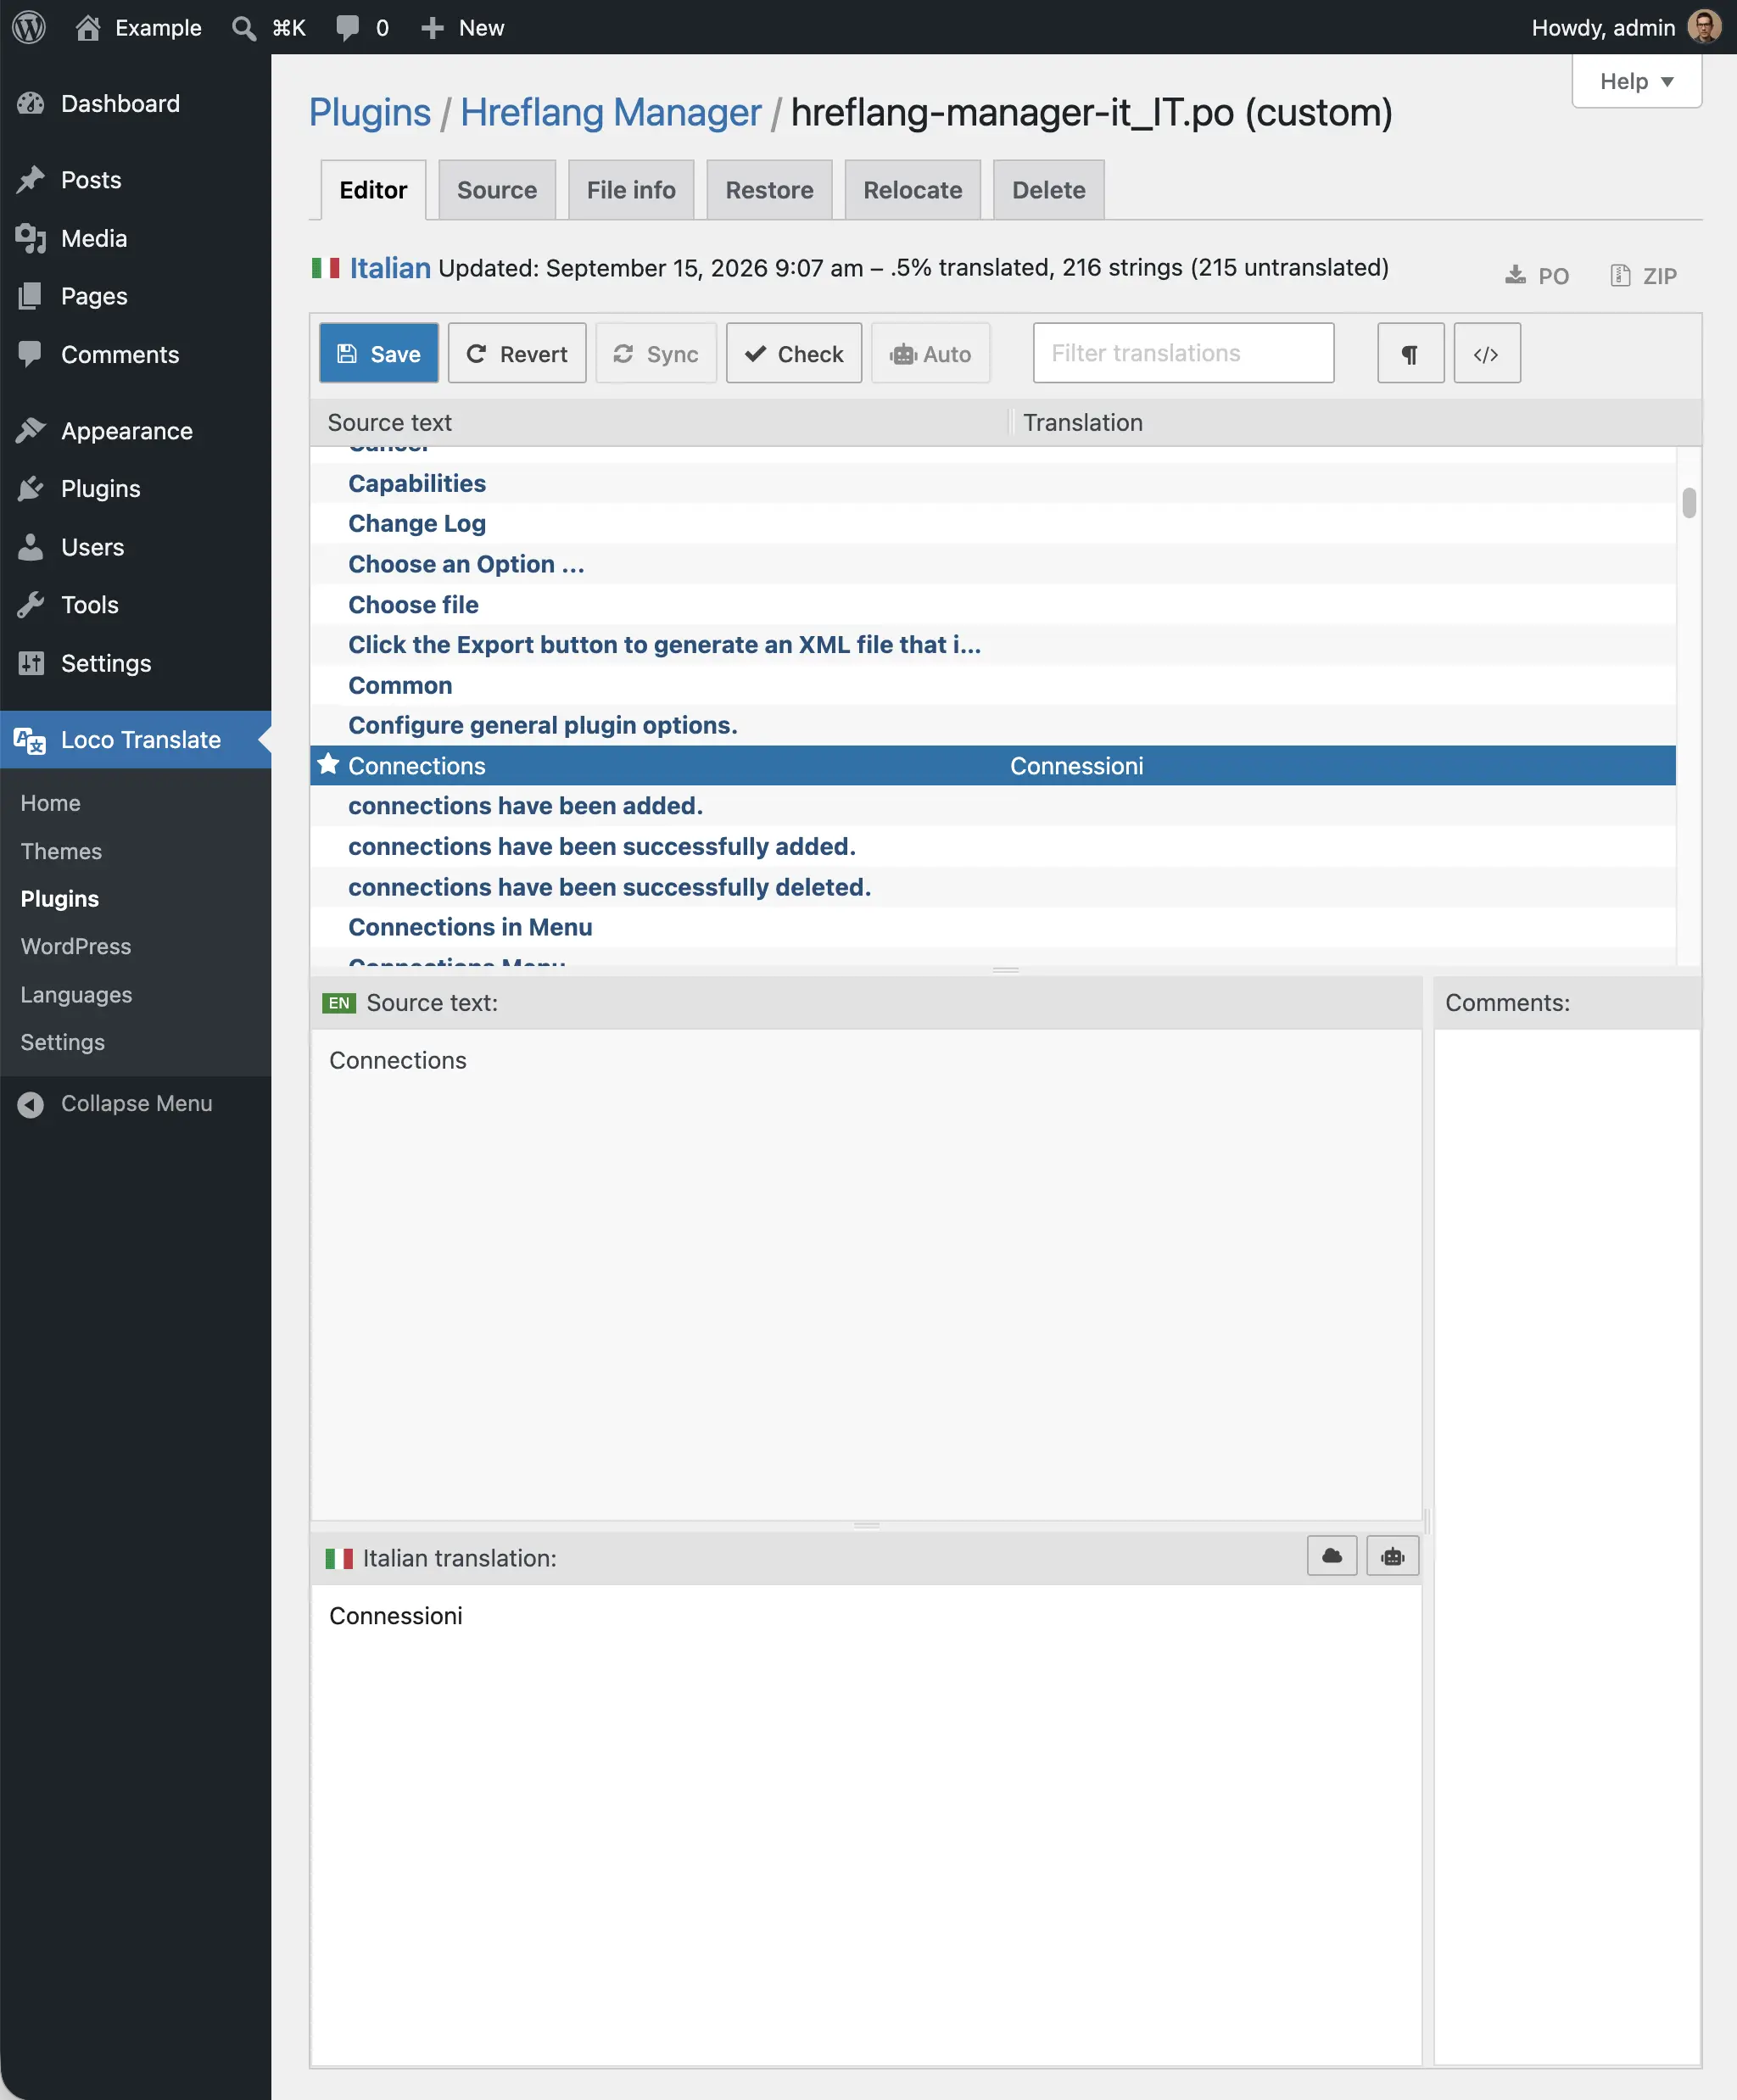
There is also a filter field above the string list. If you only need to change one specific label, type part of it there rather than scrolling.
When you click Save, Loco Translate writes the PO file to disk and compiles the MO file that WordPress will load.
Step 5: Verify the Translation
The file is saved, but you should confirm the strings actually reach the interface. Switch the site to the language you just translated and check.
Go to Settings → General, set Site Language to your target language, and save. Then open the admin page or the front-end page where the string appears.
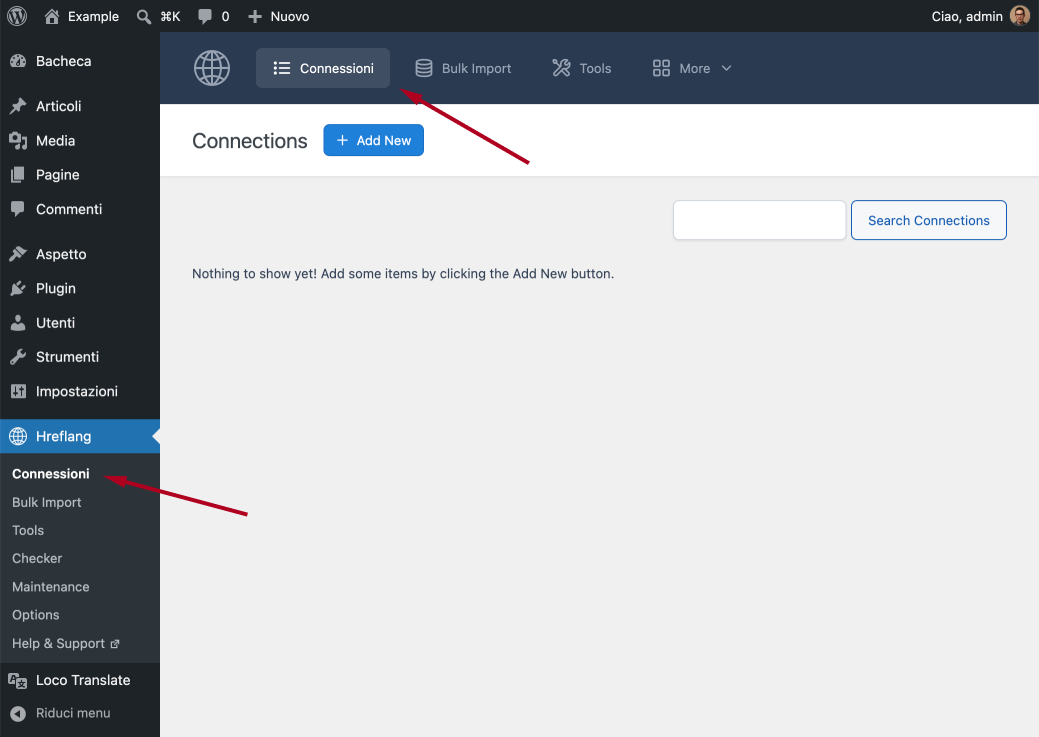
If the strings are still in English, see the troubleshooting section at the end of this guide.
Step 6: Translate the Whole Plugin Automatically
Translating an interface string by string is fine for a handful of labels. For a full plugin it is tedious, and this is where the automatic translation feature earns its place.
Loco Translate supports five providers: DeepL, Google Translate, Lecto AI, Microsoft Translator, and OpenAI. You need your own account and API key with whichever one you choose, and the provider may charge you for usage. Loco does not proxy these requests or add a fee.
Configuring the API key
Open Loco Translate → Settings and select the API keys tab. Paste your key into the section for your provider and save.
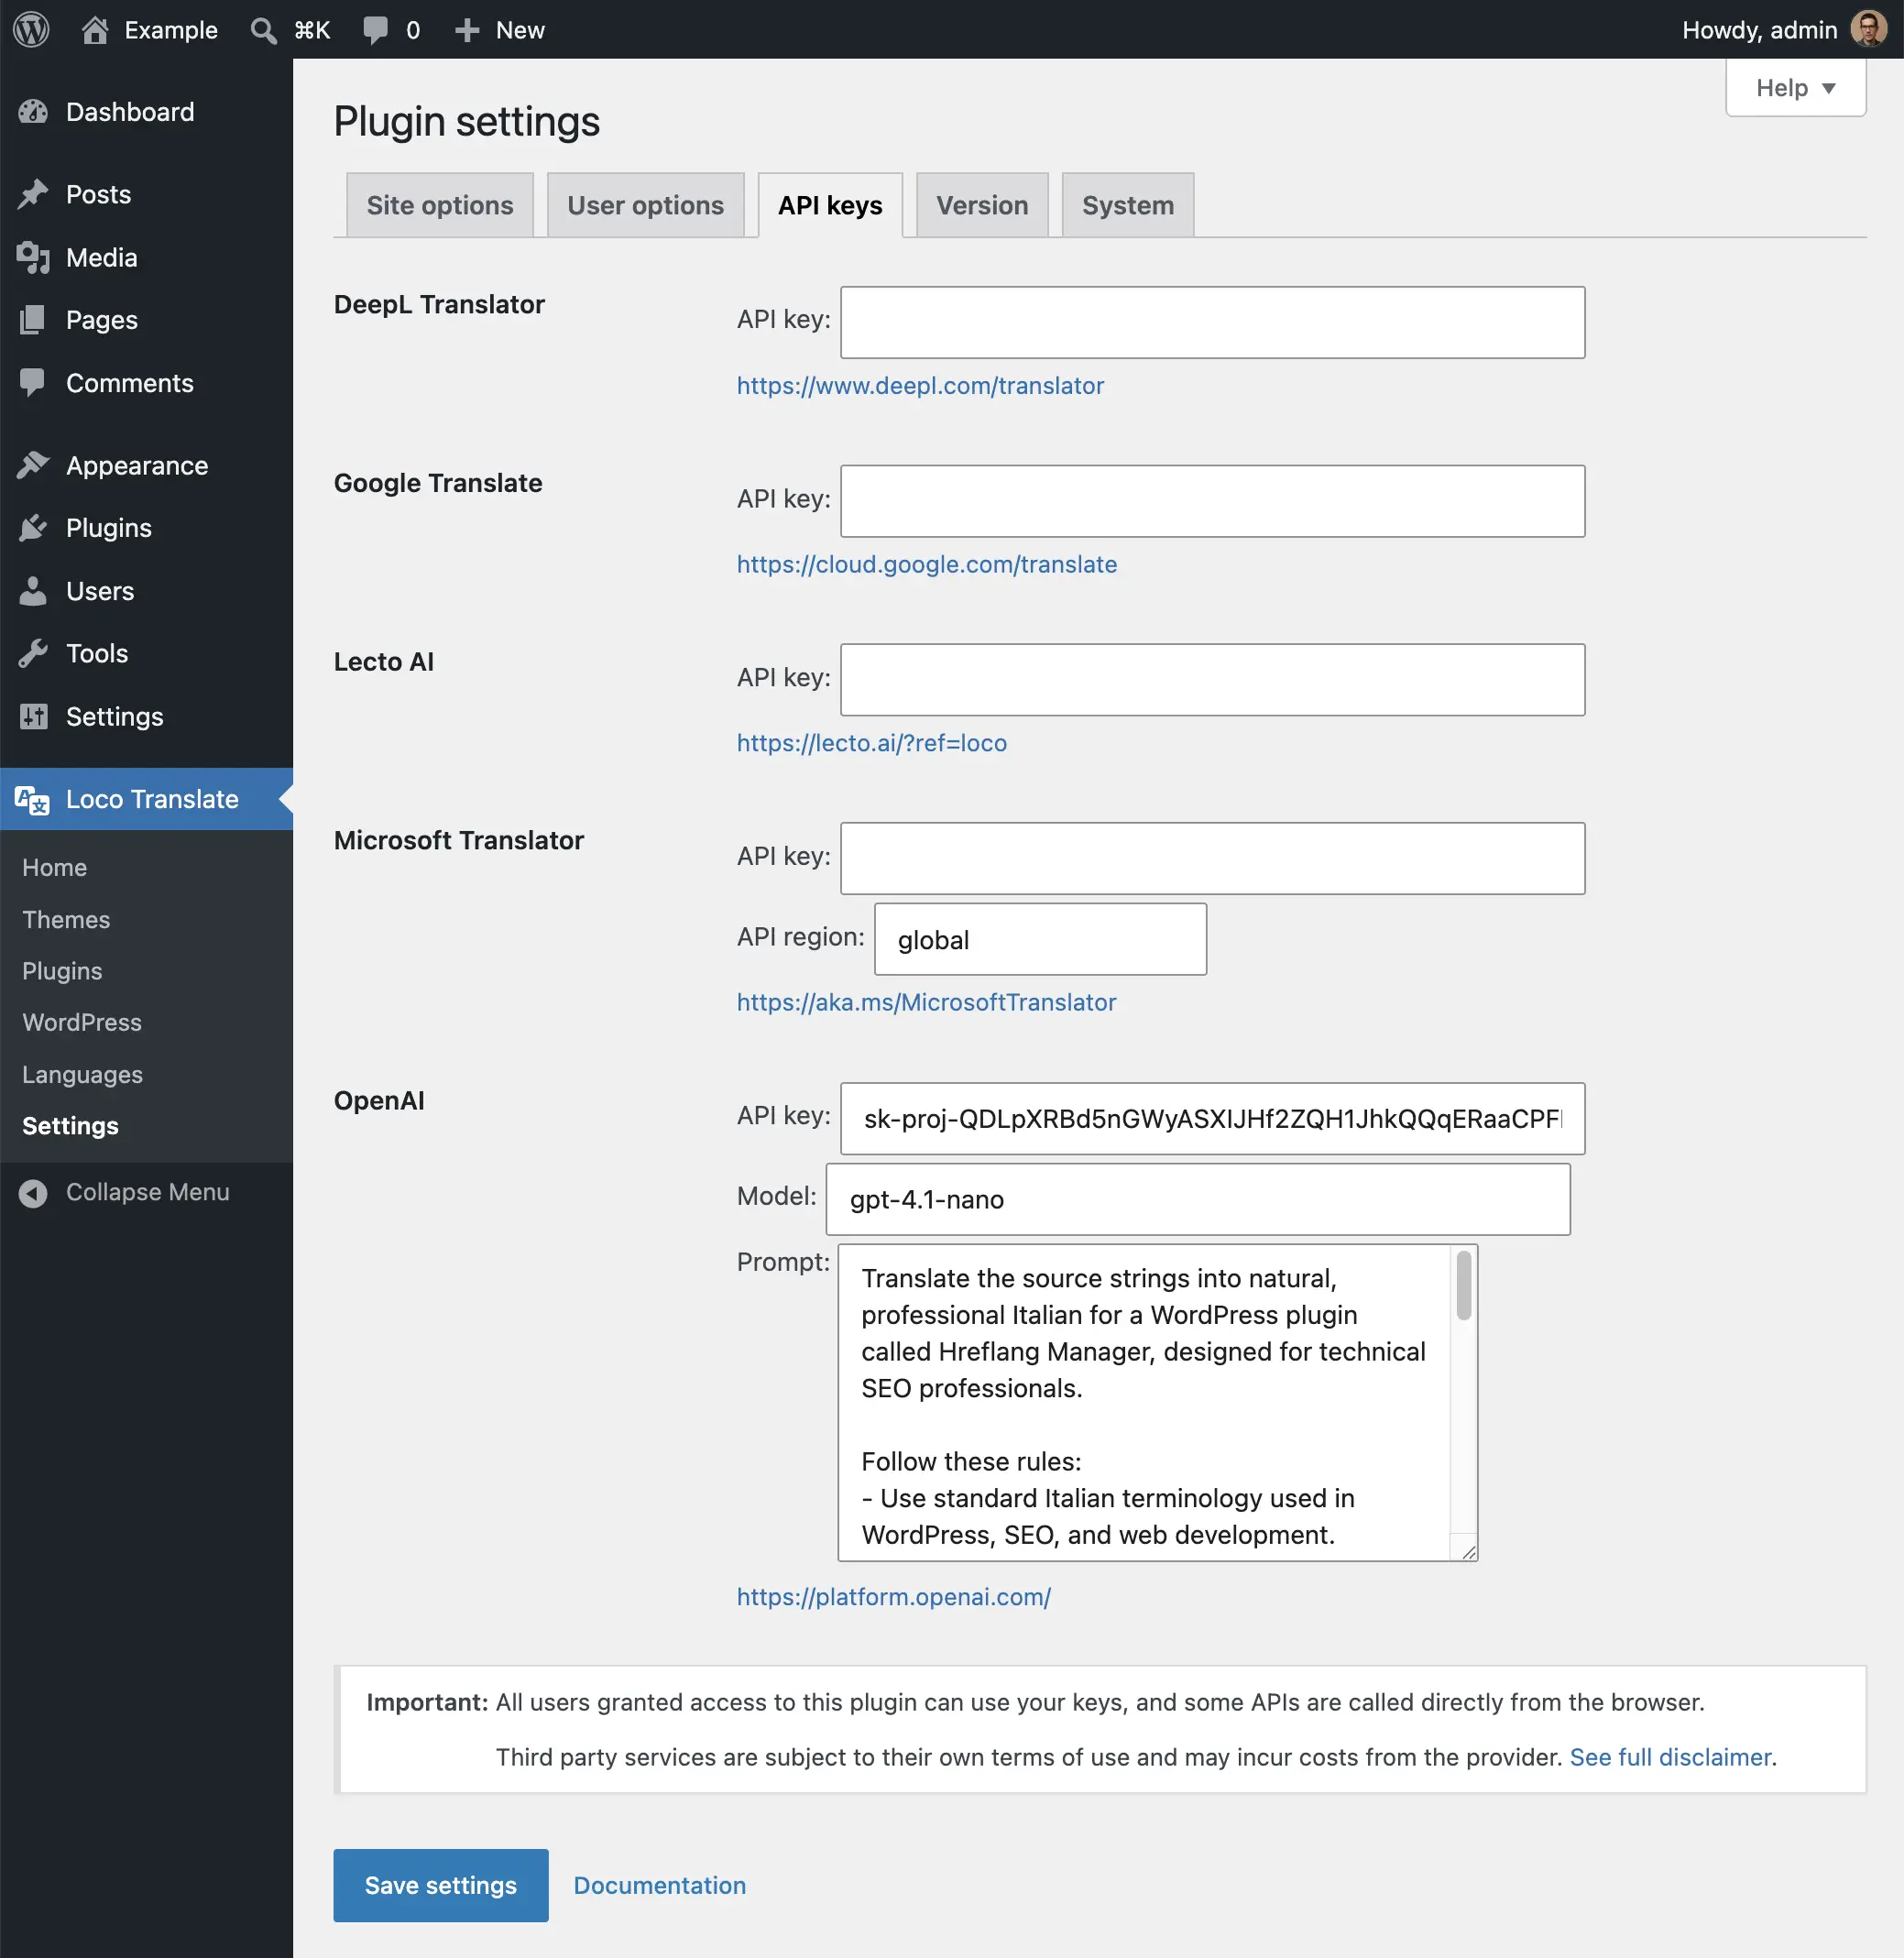
Two things are worth knowing before you do this. The keys are stored as WordPress site options, unencrypted in the database, and any user with access to Loco Translate can use them and therefore incur charges on your account. If you only need the feature occasionally, remove the key when you are done.
Choosing a model, and why the prompt matters more
With OpenAI you also select a model and can supply a custom prompt. My recommendation is the opposite of what most people try first.
Use an inexpensive model. Translating short interface strings is not a reasoning task. In the tutorial I use GPT-4.1 nano, and the quality is more than adequate for plugin labels and messages. Across hundreds of strings the cost difference between a cheap model and a frontier one is substantial, and the quality difference on this particular task is not.
Spend the effort on the prompt instead. This is where the quality actually comes from. The API sends short, isolated strings with no surrounding context, so anything the model needs to know has to come from the prompt.
The prompt I use tells the model three things:
- The target language.
- That the strings belong to a technical SEO plugin for WordPress.
- That terminology must stay consistent across the whole file.
That third point matters more than it sounds. Without it, the same English term can come back translated three different ways in three different screens.
Running the translation
Go back to the plugin translation page and click the Auto button in the toolbar. Select your provider, and consider enabling the option to mark the results as fuzzy so you can review them afterwards. Loco shows you a character count before running, which is what the provider will bill against.
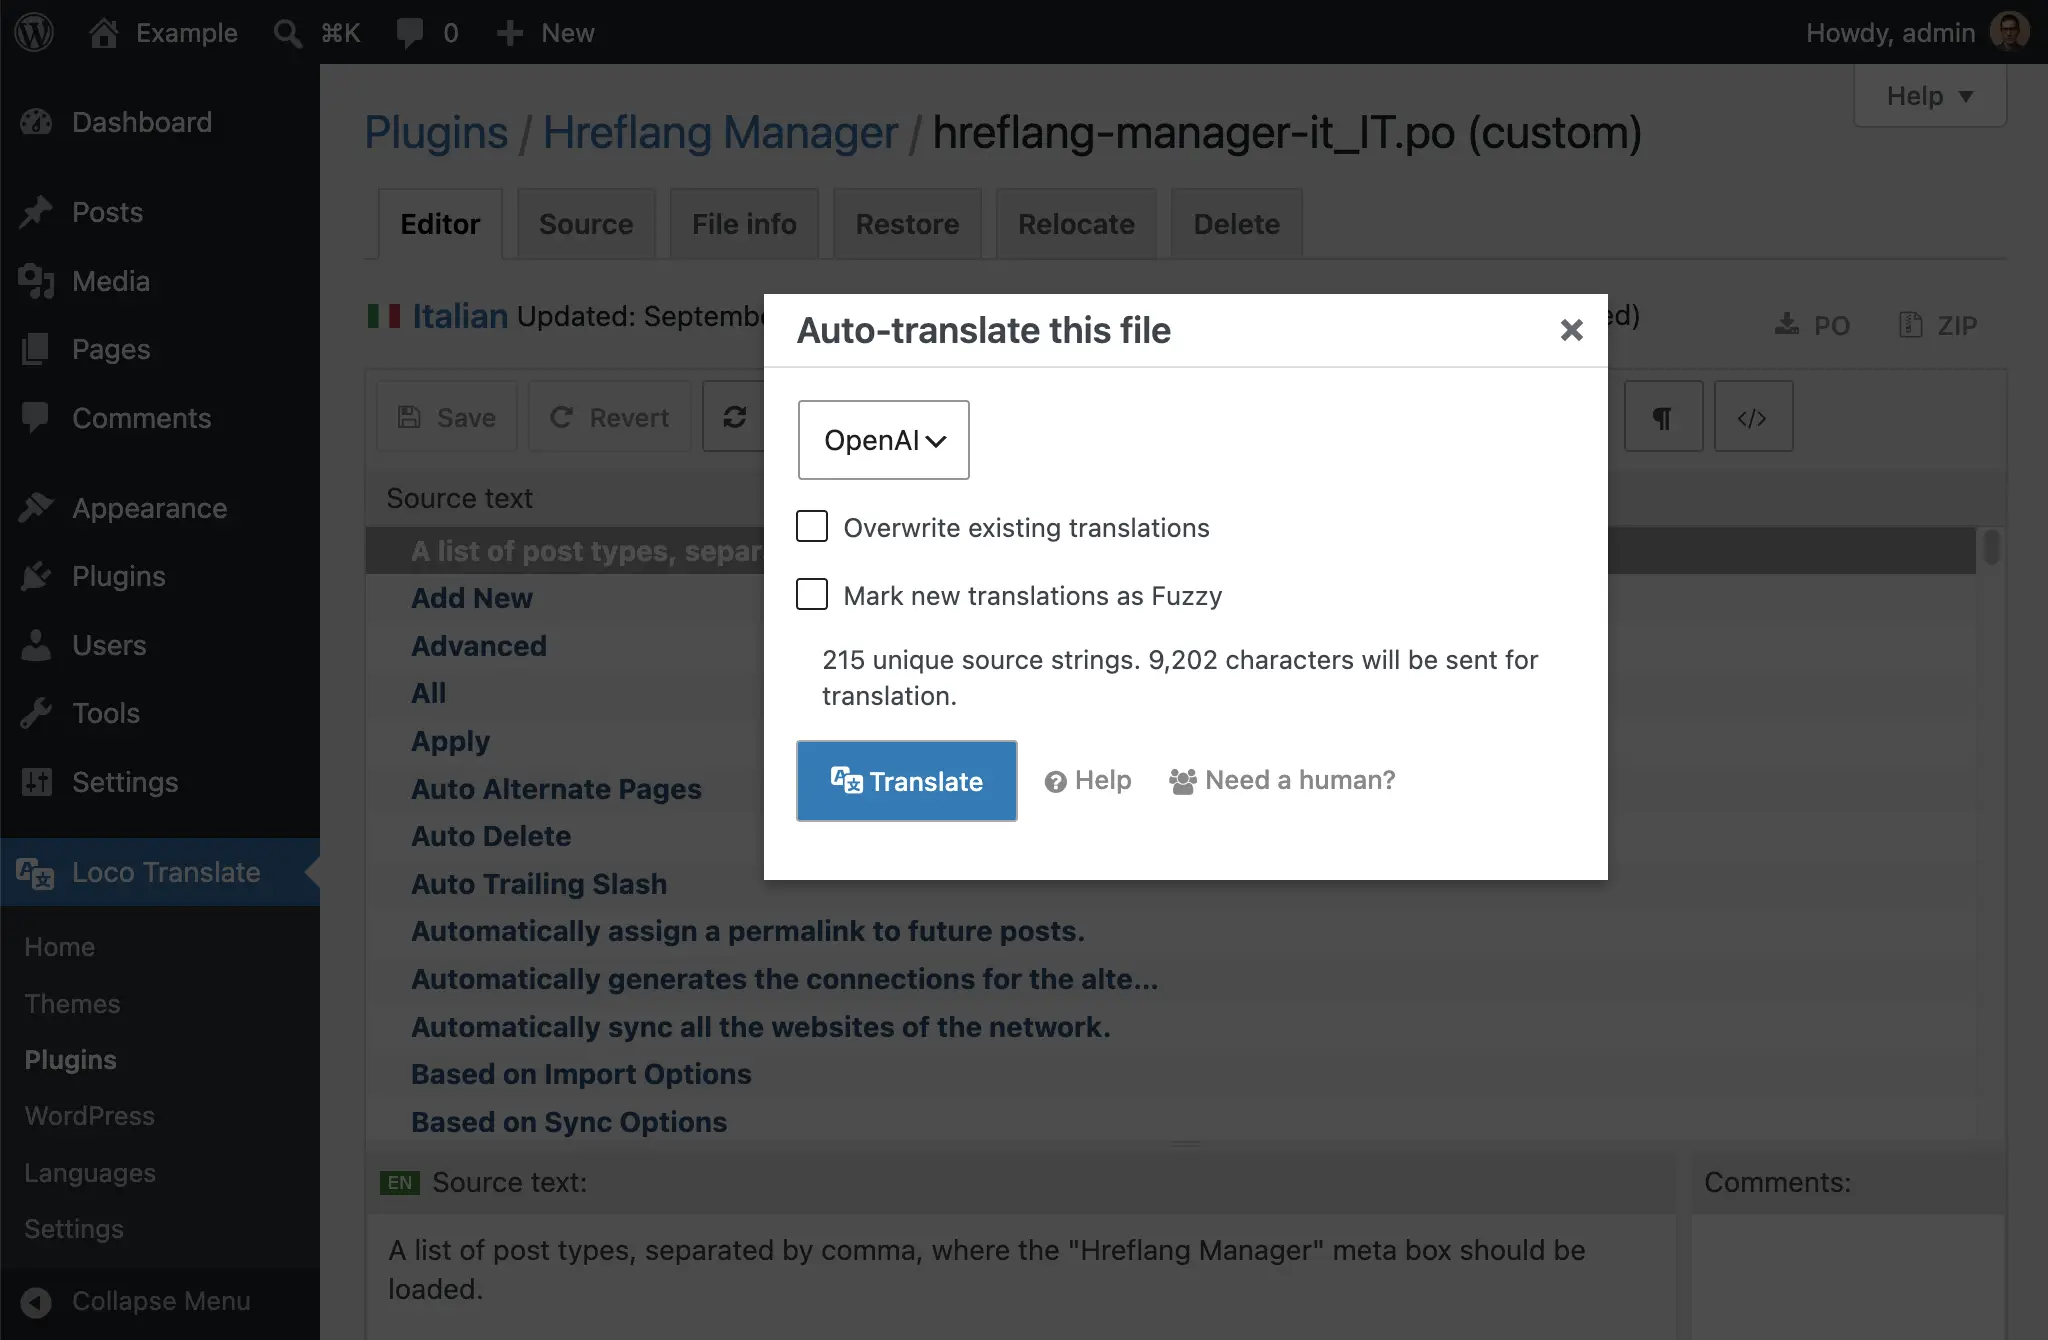
In this case the entire plugin interface is translated in about ten seconds, and the OpenAI dashboard reported one cent of usage for the whole job.
Nothing is written to disk until you click Save, so you can review the output first. Note also that the Auto button is disabled while you have unsaved changes, which prevents the machine translation from overwriting work you have already done. Save first, then run it.
Always review automatic output before publishing, particularly strings containing HTML or %s style placeholders. Translation APIs sometimes return these in a broken state, with tags mangled or spaces added and removed.
Step 7: Import an Existing Translation File
If you already translate with Poedit or another Gettext editor, or if a client sends you a finished PO file, you do not need to redo the work in the browser.
From the file view in Loco Translate, use the upload function to send your PO file to the server. Loco parses it, saves it in the location you chose, and compiles the MO file.
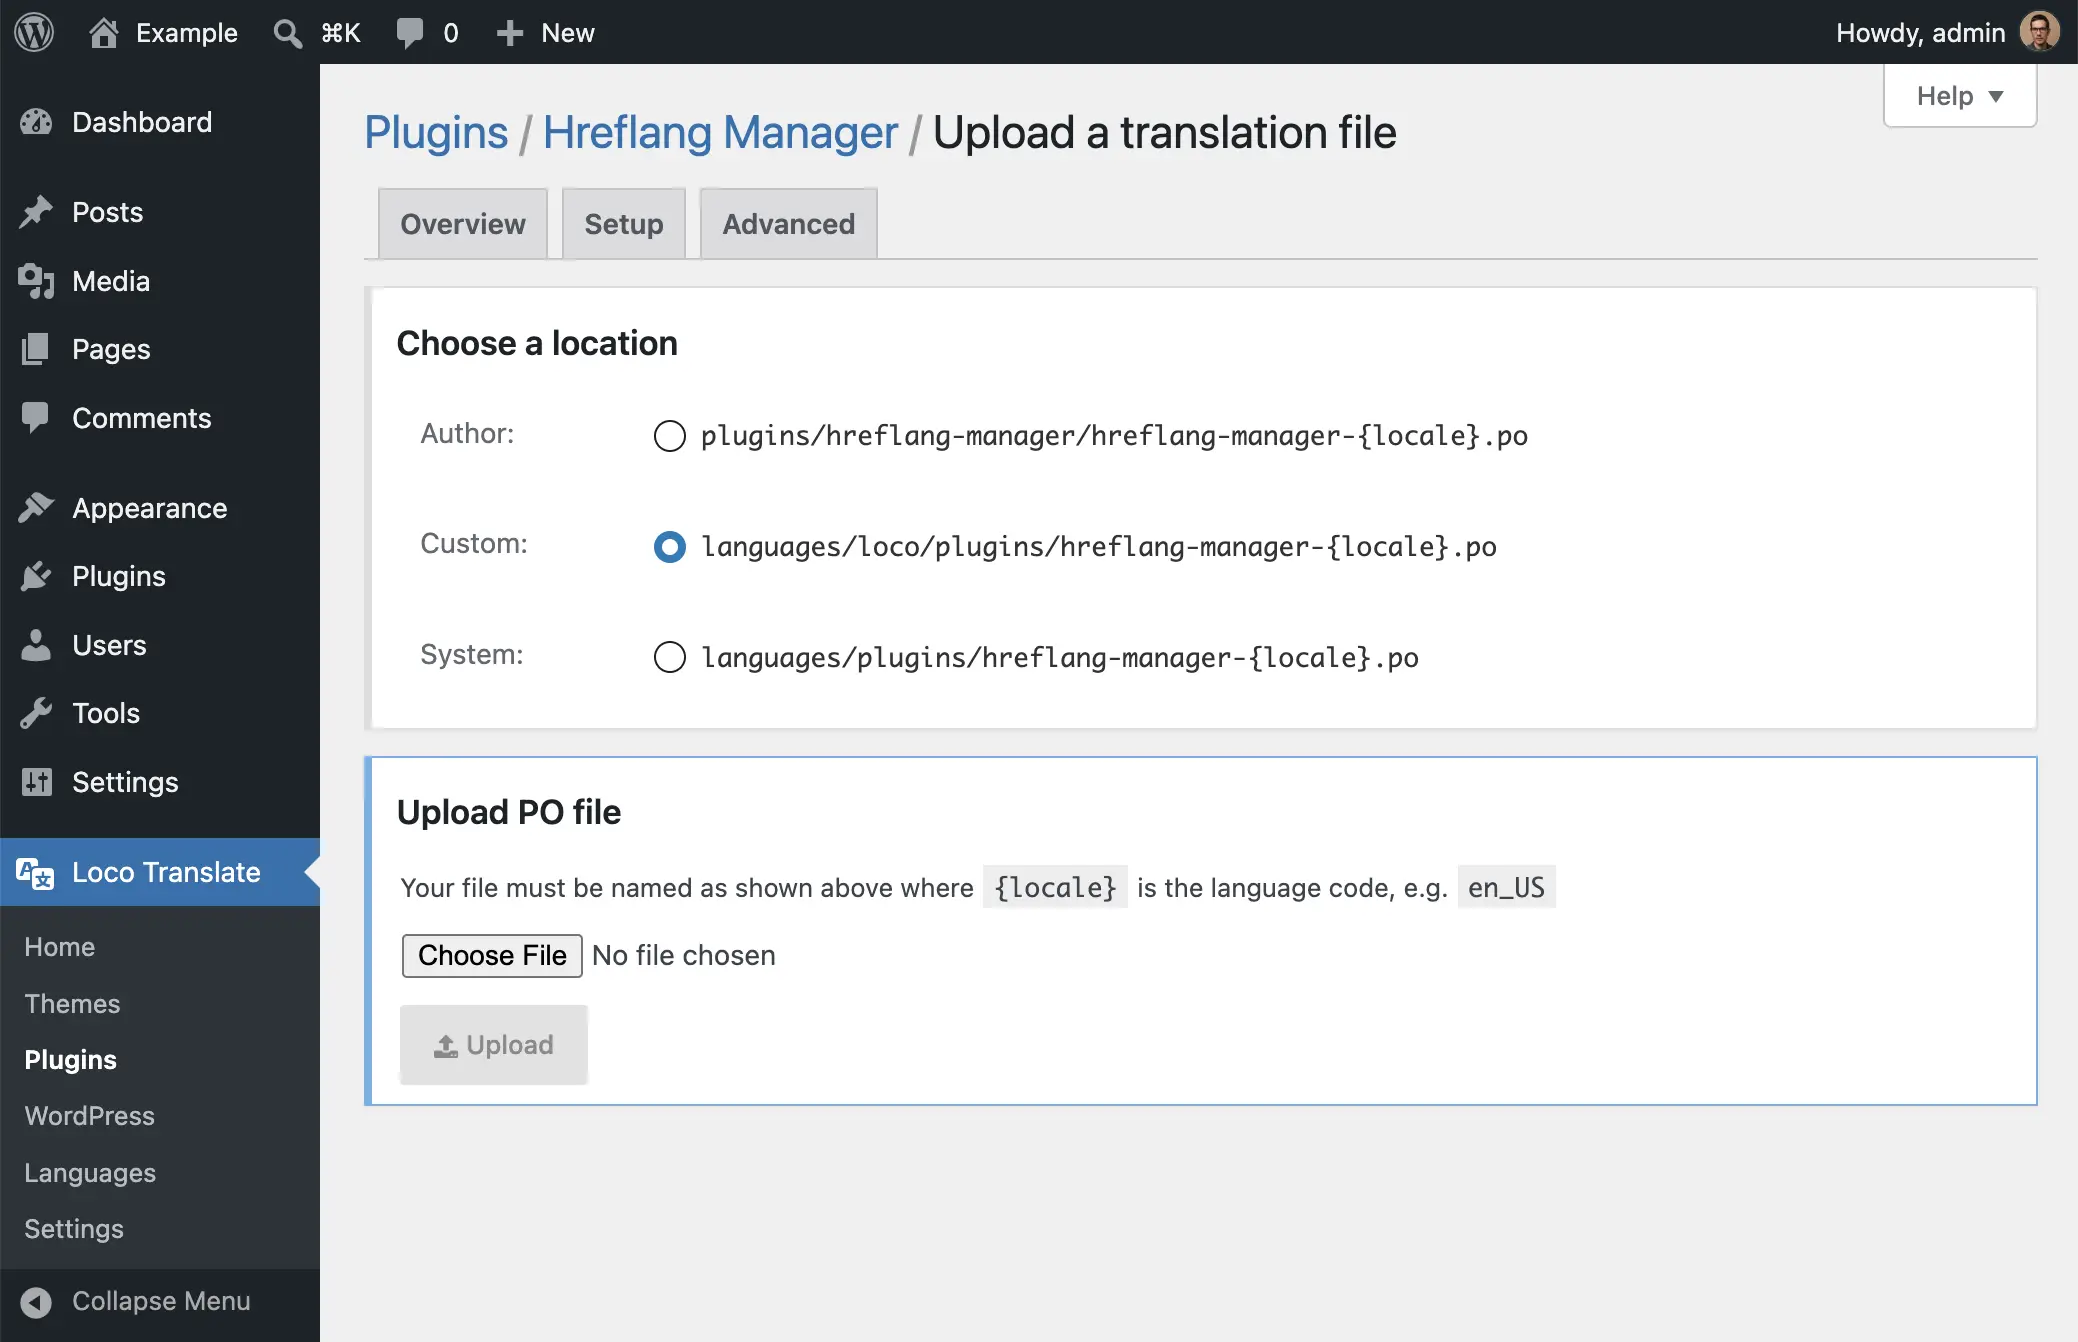
After uploading, open the file in the editor and confirm that the strings came through as expected.
Step 8: Sync After Plugin Updates
When a plugin is updated, its strings can change. New ones are added, old ones are removed, and some are reworded.
Open your translation file and click the Sync button in the toolbar. Loco compares your file against the available source strings and reports what changed. Nothing is saved until you click Save, so running Sync to see what it reports is always safe.
Strings that were removed but closely resemble a new one are kept and flagged as fuzzy, based on the fuzzy matching tolerance in the settings. This saves retranslating strings that only changed by a word.
Translating Themes and WordPress Core
The process is identical for themes and for WordPress core. Use Loco Translate → Themes or Loco Translate → WordPress, and everything described above applies unchanged, including the location choices, the editor, and the automatic translation.
One difference is worth mentioning for themes. Many themes do not ship a POT file. When that happens, Loco Translate offers a Create template link that extracts the strings directly from the source code. If an existing translation is already installed, there is a faster route. Hover the language, click Copy, select the same language, choose the Custom location, and keep the Just copy English source strings option. You then have a custom file that overrides only the strings you change.
Troubleshooting
Some strings cannot be translated, or the translation has no effect
The plugin or theme is not internationalized correctly. WordPress translation functions such as __() and _e() must wrap every translatable string, with the correct text domain. If a developer has hardcoded a string, no translation tool can reach it. Contact the author, or modify the plugin yourself if it is a custom one.
The custom file is saved but the translation is not loading
Some plugins and themes do not load translations from the Custom folder because they load their language files in a non-standard way. Test with a different location, or ask the author how the bundle loads its translations.
The file cannot be saved
The web server does not have write permission for the target directory. Loco Translate will prompt for FTP or SSH credentials in this case. As an alternative, the editor has download buttons that let you export the current state as a PO or MO file and upload it yourself.
Translations disappear after an update
The file was saved in the Author or System location. Recreate it in the Custom folder.
Translating Content Rather Than Interfaces
Loco Translate handles the text built into your themes and plugins, meaning buttons, labels, notices, and admin screens. This is the single most common misunderstanding about the plugin, so it is worth repeating from the start of this guide.
Your actual content, meaning posts, pages, categories, tags, and menus, needs a multilingual plugin. We covered that setup in a separate video: Polylang WordPress Plugin Tutorial.
If you run a multilingual site, you will also need hreflang tags so that search engines serve the right language version to the right visitor. Our Hreflang Manager plugin handles that, and the free version is available on the WordPress repository.
Conclusion
Loco Translate removes the desktop editor and the FTP client from the translation workflow. Everything happens in the WordPress admin, and the MO file is compiled for you on every save.
Two decisions determine whether the result lasts. Save your files in the Custom location, because anything else will eventually be overwritten by an update. And if you use automatic translation, put the effort into the prompt rather than the model. A cheap model with good context produces better translations than an expensive one working blind, at a fraction of the cost.