Table of Contents
- Video Tutorials
- Installation – Single Site
- Installation – Multisite
- Update – Single Site
- Update – Multisite
- Introduction
- Hreflang Sync
- Locale Selector
- Tag Inspector
- Tutorials
- Credits
- FAQ
Video Tutorials
This video series covers the functionalities of the Hreflang Manager plugin.
Please note that not all the aspects and implications are covered in this section. It’s recommended that you read the entire documentation before using this plugin in a production environment or asking for support to the plugin author.
- Implement hreflang on any WordPress URL
- Implement hreflang on WordPress posts
- Import and Export Connections
Installation – Single Site
With this procedure, you will be able to install the Hreflang Manager plugin on your WordPress website.
- Visit the Plugins -> Add New menu
- Click on the Upload Plugin button and select the zip file you just downloaded
- Click on Install Now
- Click on Activate Plugin
Installation – Multisite
This plugin supports both a Network Activation (the plugin will be activated on all the sites of your WordPress Network) and a Single Site Activation in a WordPress Network environment (your plugin will be activated on a single site of the network).
With this procedure, you will be able to perform a Network Activation:
- Visit the Plugins -> Add New menu
- Click on the Upload Plugin button and select the zip file you just downloaded
- Click on Install Now
- Click on Network Activate
With this procedure, you will be able to perform a Single Site Activation in a WordPress Network environment:
- Visit the specific site of the WordPress Network where you want to install the plugin
- Visit the Plugins menu
- Click on the Activate button (just below the name of the plugin)
Update – Single Site
With this procedure, you will be able to update the Hreflang Manager plugin:
- Visit the Plugins menu
- Click on Deactivate
- Update the plugin files with your favorite FTP client (delete the files of the old version and add the files of the new version)
- Click on Activate
Update – Multisite
To update the plugin in all the sites of your WordPress Network, follow this procedure:
- Visit the Plugins menu
- Click on Network Deactivate
- Update the plugin files with your favorite FTP client (delete the files of the old version and add the files of the new version)
- Click on Network Activate
To update the plugin in single sites of the WordPress Network, follow this procedure:
- Visit the specific site of the WordPress Network where you want to update the plugin
- Visit the Plugins menu
- Click on Deactivate
- Update the plugin files with your favorite FTP client (skip this step if you have already updated the plugin files during the plugin update of another single site of the WordPress Network)
- Click on Activate
Introduction
Hreflang, explained in detail in this document provided by Google, gives search engines information on which language variations, language script variations, or geo-targeted versions of a page should be served to the users.
The Hreflang Manager plugin generates HTML link elements with included the hreflang attribute in the header of the pages available in the front end of your WordPress installation.
With this plugin, you have two alternative ways to implement hreflang, from the Hreflang -> Connections menu and from the Hreflang Manager sidebar available in the post editor.
Connections Menu
The Connections Menu can be used to implement the hreflang attribute in any page (posts, pages, custom post types, homepage, categories, archives, etc.) of your WordPress website.
Hreflang Manager Sidebar
The Hreflang Manager sidebar, available in the post editor, can be used to implement the hreflang attribute on the posts (posts, pages, and custom post types).
To implement the hreflang attribute with the Hreflang Manager sidebar, follow this procedure:
- Visit a post
- Click on the Hreflang Manager button
- Open the Edit Connection modal window
- Enter the URLs of the alternative versions of the post with the related languages, scripts, and geo-targets
- Close the modal window
- Update the post
Hreflang Sync
The sync feature allows you to set up hreflang in a single website of the network (Controller) and automatically sync the other websites of the network. (Responder)
In order to use this feature, apply this procedure in the “Controller” website:
- Visit the Hreflang Sync tab available in the Hreflang -> Options menu
- Set the Status option to “Enabled”
- Set the Role option to “Controller”
Then set up all the “Responder” websites with this procedure:
- Visit the Hreflang Sync tab available in the Hreflang -> Options menu.
- Set the Status option to “Enabled”.
- Set the Role option to “Responder”.
- Set the frequency of the updates with the Frequency option. The plugin uses WP Cron to schedule the sync activity based on the defined frequency. The following frequency values are available: Hourly, Twice Daily, Daily, Weekly.
- Enter the REST API endpoint generated by the controller website in the Controller Endpoint option. This value should be equal to the URL of the controller website plus the suffix “/wp-json/daext-hreflang-manager/v1/sync”. For example, if the controller website is “https://example.com” the value of this option should be “https://example.com/wp-json/daext-hreflang-manager/v1/sync”.
- Set the Sync Mode option to “Based on Sync Options”. Note that by leaving the value of this option to “Exact Copy” the plugin makes an exact copy of the connections without adapting the Url to Connect value.
- Set the Language, Script, and Locale used in this website. The plugin uses this information to set the URL to Connect value of each connection imported from the controller website.
Please note that the procedure used to sync the data is executed at periodic intervals (defined with the Frequency option) and also each time you save the plugin options in the Hreflang -> Options menu.
Locale Selector
The locale selector is a widget that allows users to switch between the different language, script, and country versions of the current page.
The plugin offers multiple implementation options for the locale selector. Let’s see what they are.
Automatic Locale Selector in Content
This implementation method allows you to automatically add the locale selector in the content of the page. The locale selector will be added at the beginning or the end of the content of the page.
To enable this feature, follow this procedure:
- Visit the Hreflang -> Options menu
- Open the Locale Selector tab
- Activate the Automatic Insertion -> Status toggle
- Use the Position option to set the position of the locale selector in the content of the page. The available options are “Beginning” and “End”.
- Use the Target Post Types option to set the post types where the locale selector should be added.
Add the Locale Selector in the Theme
This implementation method allows you to add the locale selector in the theme of your website. The locale selector will be added in any place of the theme where you call the da_hm_locale_selector() function.
To enable this feature, follow this procedure:
- Edit the theme file where you want to add the locale selector
- Add the following code where you want to add the locale selector:
<?php da_hm_locale_selector(); ?>
Add the Locale Selector with a Shortcode
This implementation method allows you to add the locale selector in the content of the page using a shortcode. The locale selector will be added in any place of the content where you call the [da-hm-locale-selector] shortcode.
To enable this feature, follow this procedure:
- Edit a post or a page
- Add the following shortcode where you want to add the locale selector:
[da-hm-locale-selector]
Add the Locale Selector Using the Dedicated Block
This implementation method allows you to add the locale selector in the content of the post or in a template file using the site editor, using a dedicated block. The locale selector will be added in any place of the content where you call the “Locale Selector” block.
To enable this feature, follow this procedure:
- Edit a post (e.g.: Posts -> Add New) or a template (e.g. Appearance -> Editor) using the site editor
- Click on the Add Block button
- Search for the “Locale Selector” block
- Click on the “Locale Selector” block to add it in the content of the page
- Update the post or page
- Visit the front end of the post or page to see the locale selector in action
Using Flags in the Locale Selector
This feature of the plugin enables the display of flags alongside textual content in the locale selector. Flags provide a visual cue to users about the alternate page they are selecting.
Enabling Flags
Flags are displayed when the Display Flags option is enabled in the plugin settings.
Applicable Display Styles
Flags are shown only with the following display styles:
- Dropdown Menu
- Modal Selector
- List of Links
Flag Display Logic
Primary Logic
If a locale code is present (e.g., en-US, it-CH), the corresponding country flag is shown.
- Example: `EN-US` → United States flag
- Example: `IT-CH` → Switzerland flag
Secondary Logic
If only a language code is present without a country code (e.g., en, it), the flag is determined using a language-to-country default mapping table. This table maps language codes to the most appropriate country flags. Note that this mapping is based on known relations between languages and countries. It is not exhaustive and may not cover all cases. Please note that the site administrator can override this mapping based on their preferences, please see the section below for details.
- Example: `EN` → United Kingdom Flag (default mapping for English)
- Example: `IT` → Italian Flag (default mapping for Italian)
Customizing Flag Mappings
Plugin users can override or modify the default language-to-country mapping via the Advanced -> Flag Overrides option. This option accepts comma-separated entries to adjust mappings as desired.
Format example:
en=us, fr=ca
This example sets the English language code (en) to show the United States Flag, and the fr language code to show the Canadian flag.
Text Labels are Always Displayed
Regardless of the flag display, the locale selector always includes a text label with information on the language, script, and locale of the page. Flags never replace text, they only supplement it visually.
Tag Inspector
The Tag Inspector is a tool that allows you to verify the correctness of the hreflang tags implemented in the pages of your website.
Enabling the Tag Inspector
To use this feature, follow this procedure:
- Visit the Options -> General tab
- Turn on the Tag Inspector toggle
Using the Tag Inspector
The Tag Inspector appears automatically in the bottom right corner of your website’s front end when a page contains at least one hreflang tag. It only evaluates hreflang tags created by this plugin. Tags that are added manually in the theme or by other plugins are ignored.
The main view of the tag inspector is called Table View, and it shows a table with the following columns:
- Language/Locale: The hreflang ISO code of the listed page
- URL: The URL of the listed page
By clicking on the Tag View button, you can see the actual HTML link element of each listed page.
Tutorials
Connect two pages on the same website
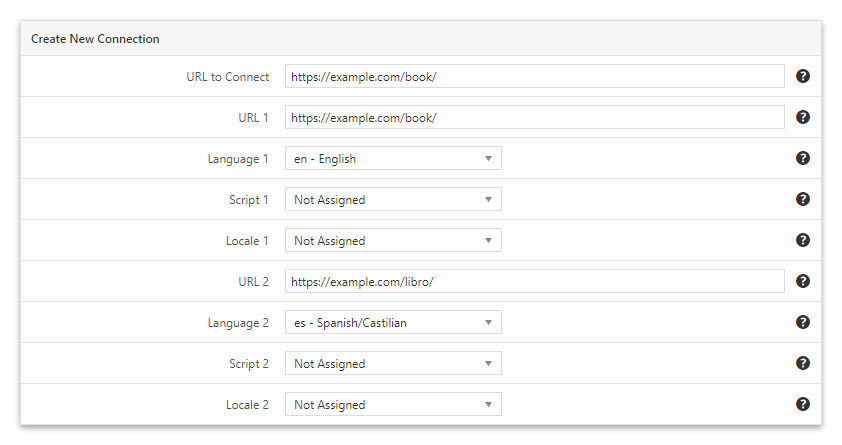
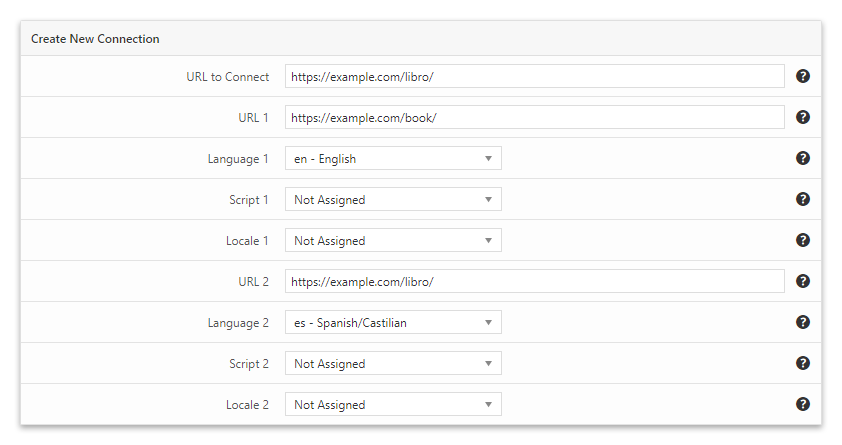
Assume that inside a single WordPress installation, you have two versions of the same page, the first one is “Book” targeted for English users, and the second one is “Libro” targeted for Spanish users.
To generate the proper hreflang markup of the English version (the page “Book”), proceed to the Hreflang -> Connections menu and enter the following data:
To generate the hreflang markup of the Spanish version (the page “Libro”), enter the following data:
Connect the homepage of four different WordPress installations
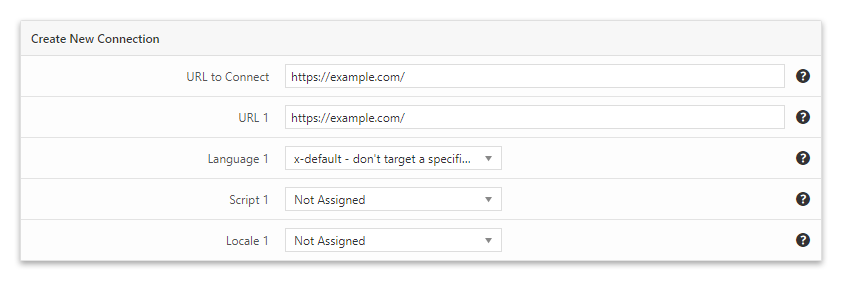
In this example, we have to connect multiple websites. The website for non-targeted users where we want to place a language and country selector is example.com.
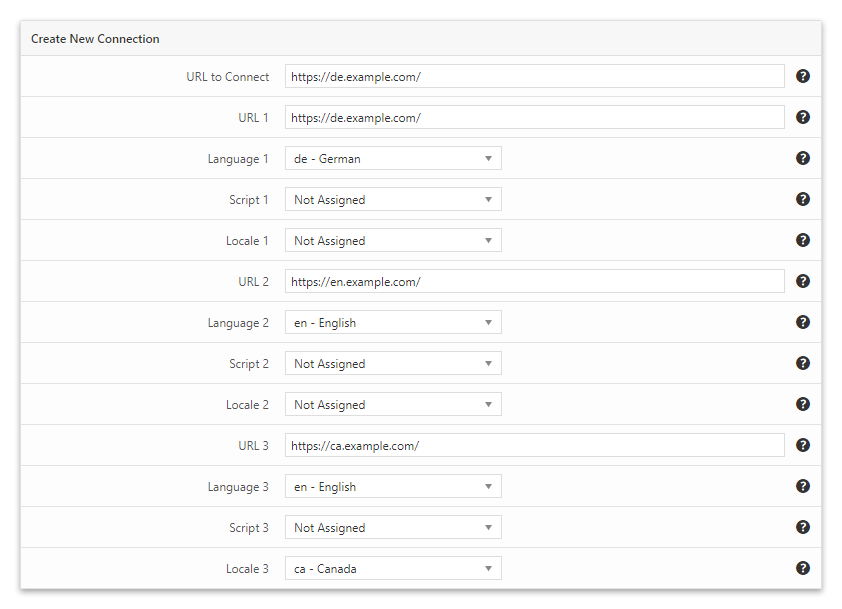
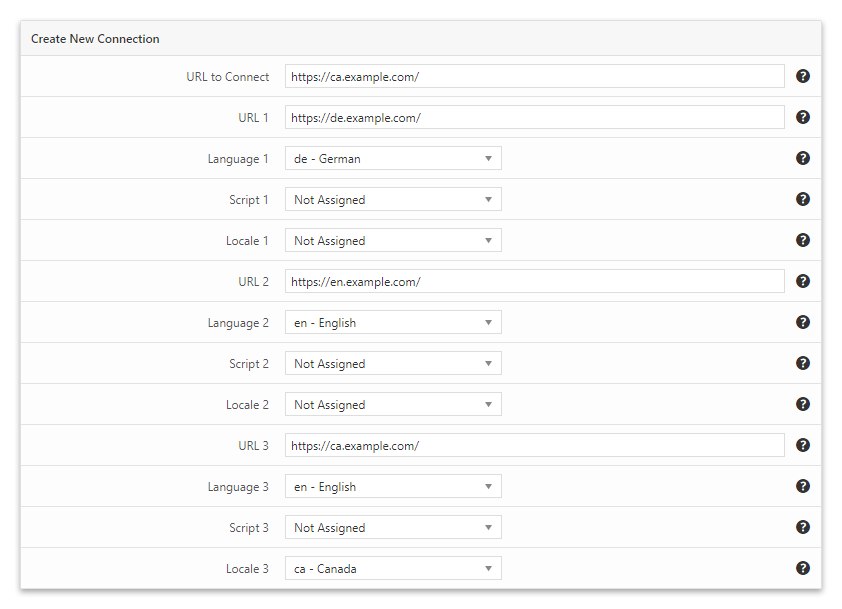
We also own the German version de.example.com (for users that use the German language), the English version en.example.com (for users that use the English language), and the Canadian version ca.example.com (for users located in Canada that use the English language).
Proceed to the example.com WordPress back-end and enter the following data:
In the de.example.com WordPress back-end, enter the following data:
In the en.example.com WordPress back-end, enter the following data:
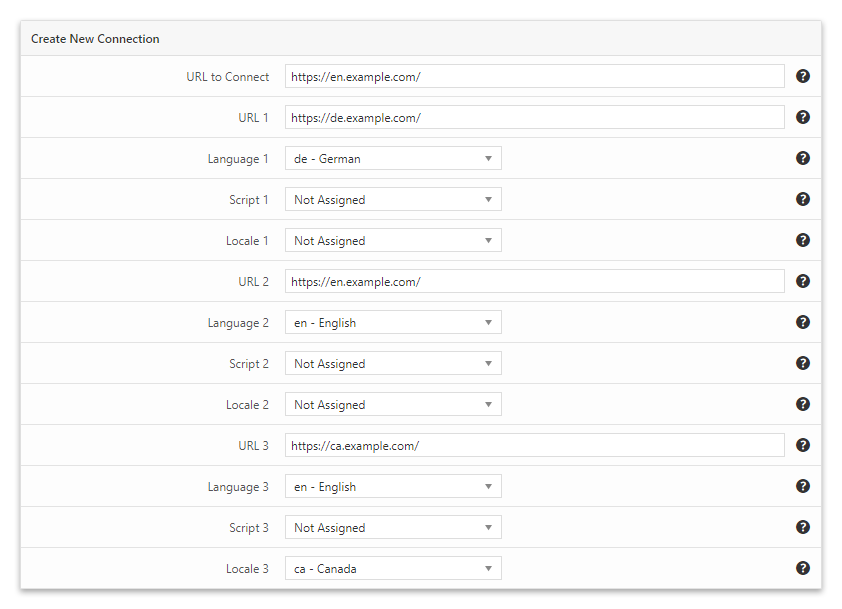
In the ca.example.com WordPress back-end, enter the following data:
Credits
This plugin makes use of the following resources:
- Handsontable licensed under the MIT License
- Select2 licensed under the MIT License
- Tom Select licensed under the Apache License Version 2.0
Faq
Which versions of PHP are supported?
PHP 5.2 and later versions are supported.
Which versions of WordPress are supported?
WordPress 4.0 and later versions are supported.