Quick Start Guide
This guide takes you from a fresh installation to a working cookie notice. It covers two setups:
- Setup A — Notice with a cookie policy. A simple notice that informs visitors and lets them read your cookie policy in a modal window. About 5 minutes.
- Setup B — Notice with cookie categories. Visitors accept or reject categories of cookies, and your tracking scripts load only after consent. About 15 minutes.
Pick the setup that fits your site. You can start with Setup A and move to Setup B later.
Before you start
Turn on Test Mode so that only site administrators see the notice while you work:
- Go to Cookie Notice → Options.
- Open the Advanced tab.
- In the Behavior section, turn on Test Mode.
- Click Save settings.
Remember to turn Test Mode off when you finish.
Setup A — Notice with a cookie policy
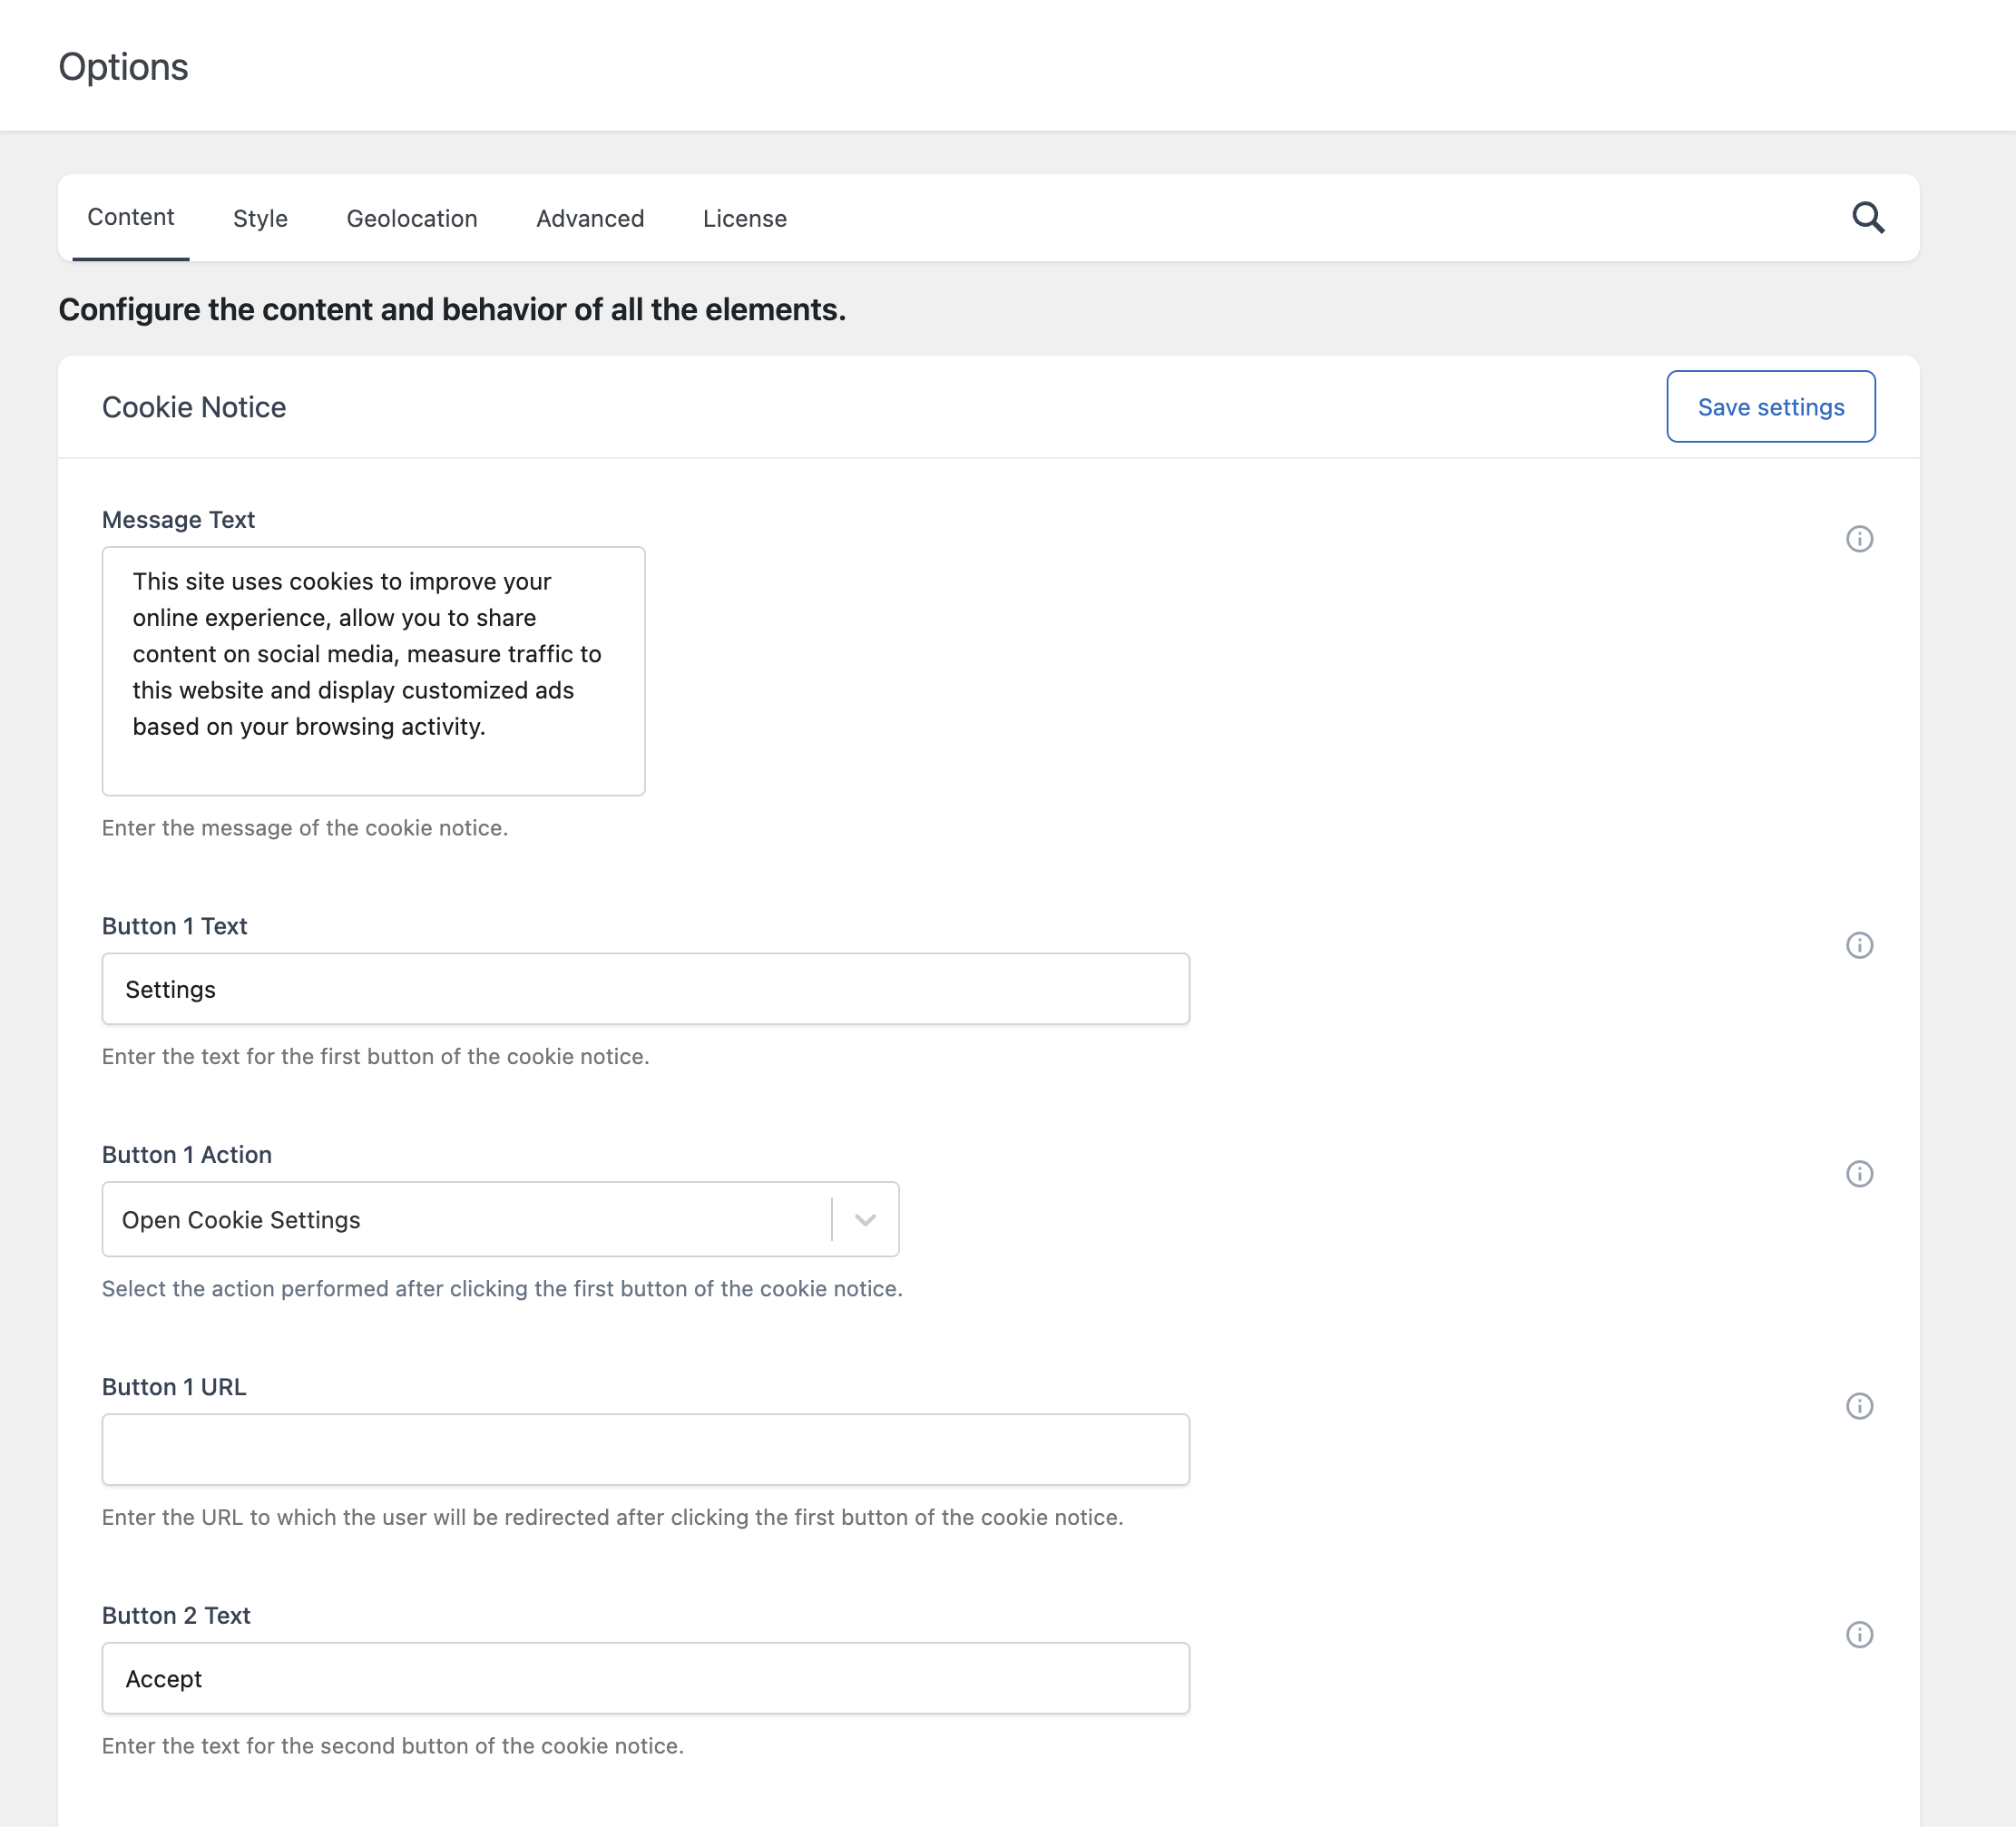
With the default settings the notice already has two buttons: Settings, which opens the cookie settings window, and Accept, which saves the acceptance and closes the notice. You only need to enter your own texts.
- Go to Cookie Notice → Options. The Content tab is open.
- In the Cookie Notice section, enter the text of the notice in Message Text.
- Change Button 1 Text and Button 2 Text if you want different button labels.
- In the Cookie Settings section, enter your cookie policy in Description Header and Description Footer. These two texts are displayed in the window opened by the Settings button.
- Click Save settings.
The text options accept these HTML tags: p, a, strong, br, ol, ul, li. For example, to link your privacy policy page in the message:
This site uses cookies. Read our <a href="https://example.com/privacy-policy/">privacy policy</a>.Open your site in a private browser window while logged in as administrator (or turn Test Mode off) and check the result.
Setup B — Notice with cookie categories
In this setup you create one section and two categories, assign the Google Analytics script to the second category, and configure the buttons to accept or reject.
Step 1 — Create a section
Sections group the categories in the cookie settings window.
- Go to Cookie Notice → Sections and click Add New.
- In Name, enter “Cookies used on this site”.
- In Description, enter a short explanation, for example “You can choose which categories of cookies you allow.”
- Click Save Changes.
Step 2 — Create a category for necessary cookies
- Go to Cookie Notice → Categories and click Add New.
- In Name, enter “Necessary”.
- In Description, explain that these cookies are required for the site to work.
- In Section, select the section created in Step 1.
- Turn off Active Toggle. Visitors cannot disable this category.
- Leave Initial State on.
- Click Save Changes.
Step 3 — Create a category for analytics cookies
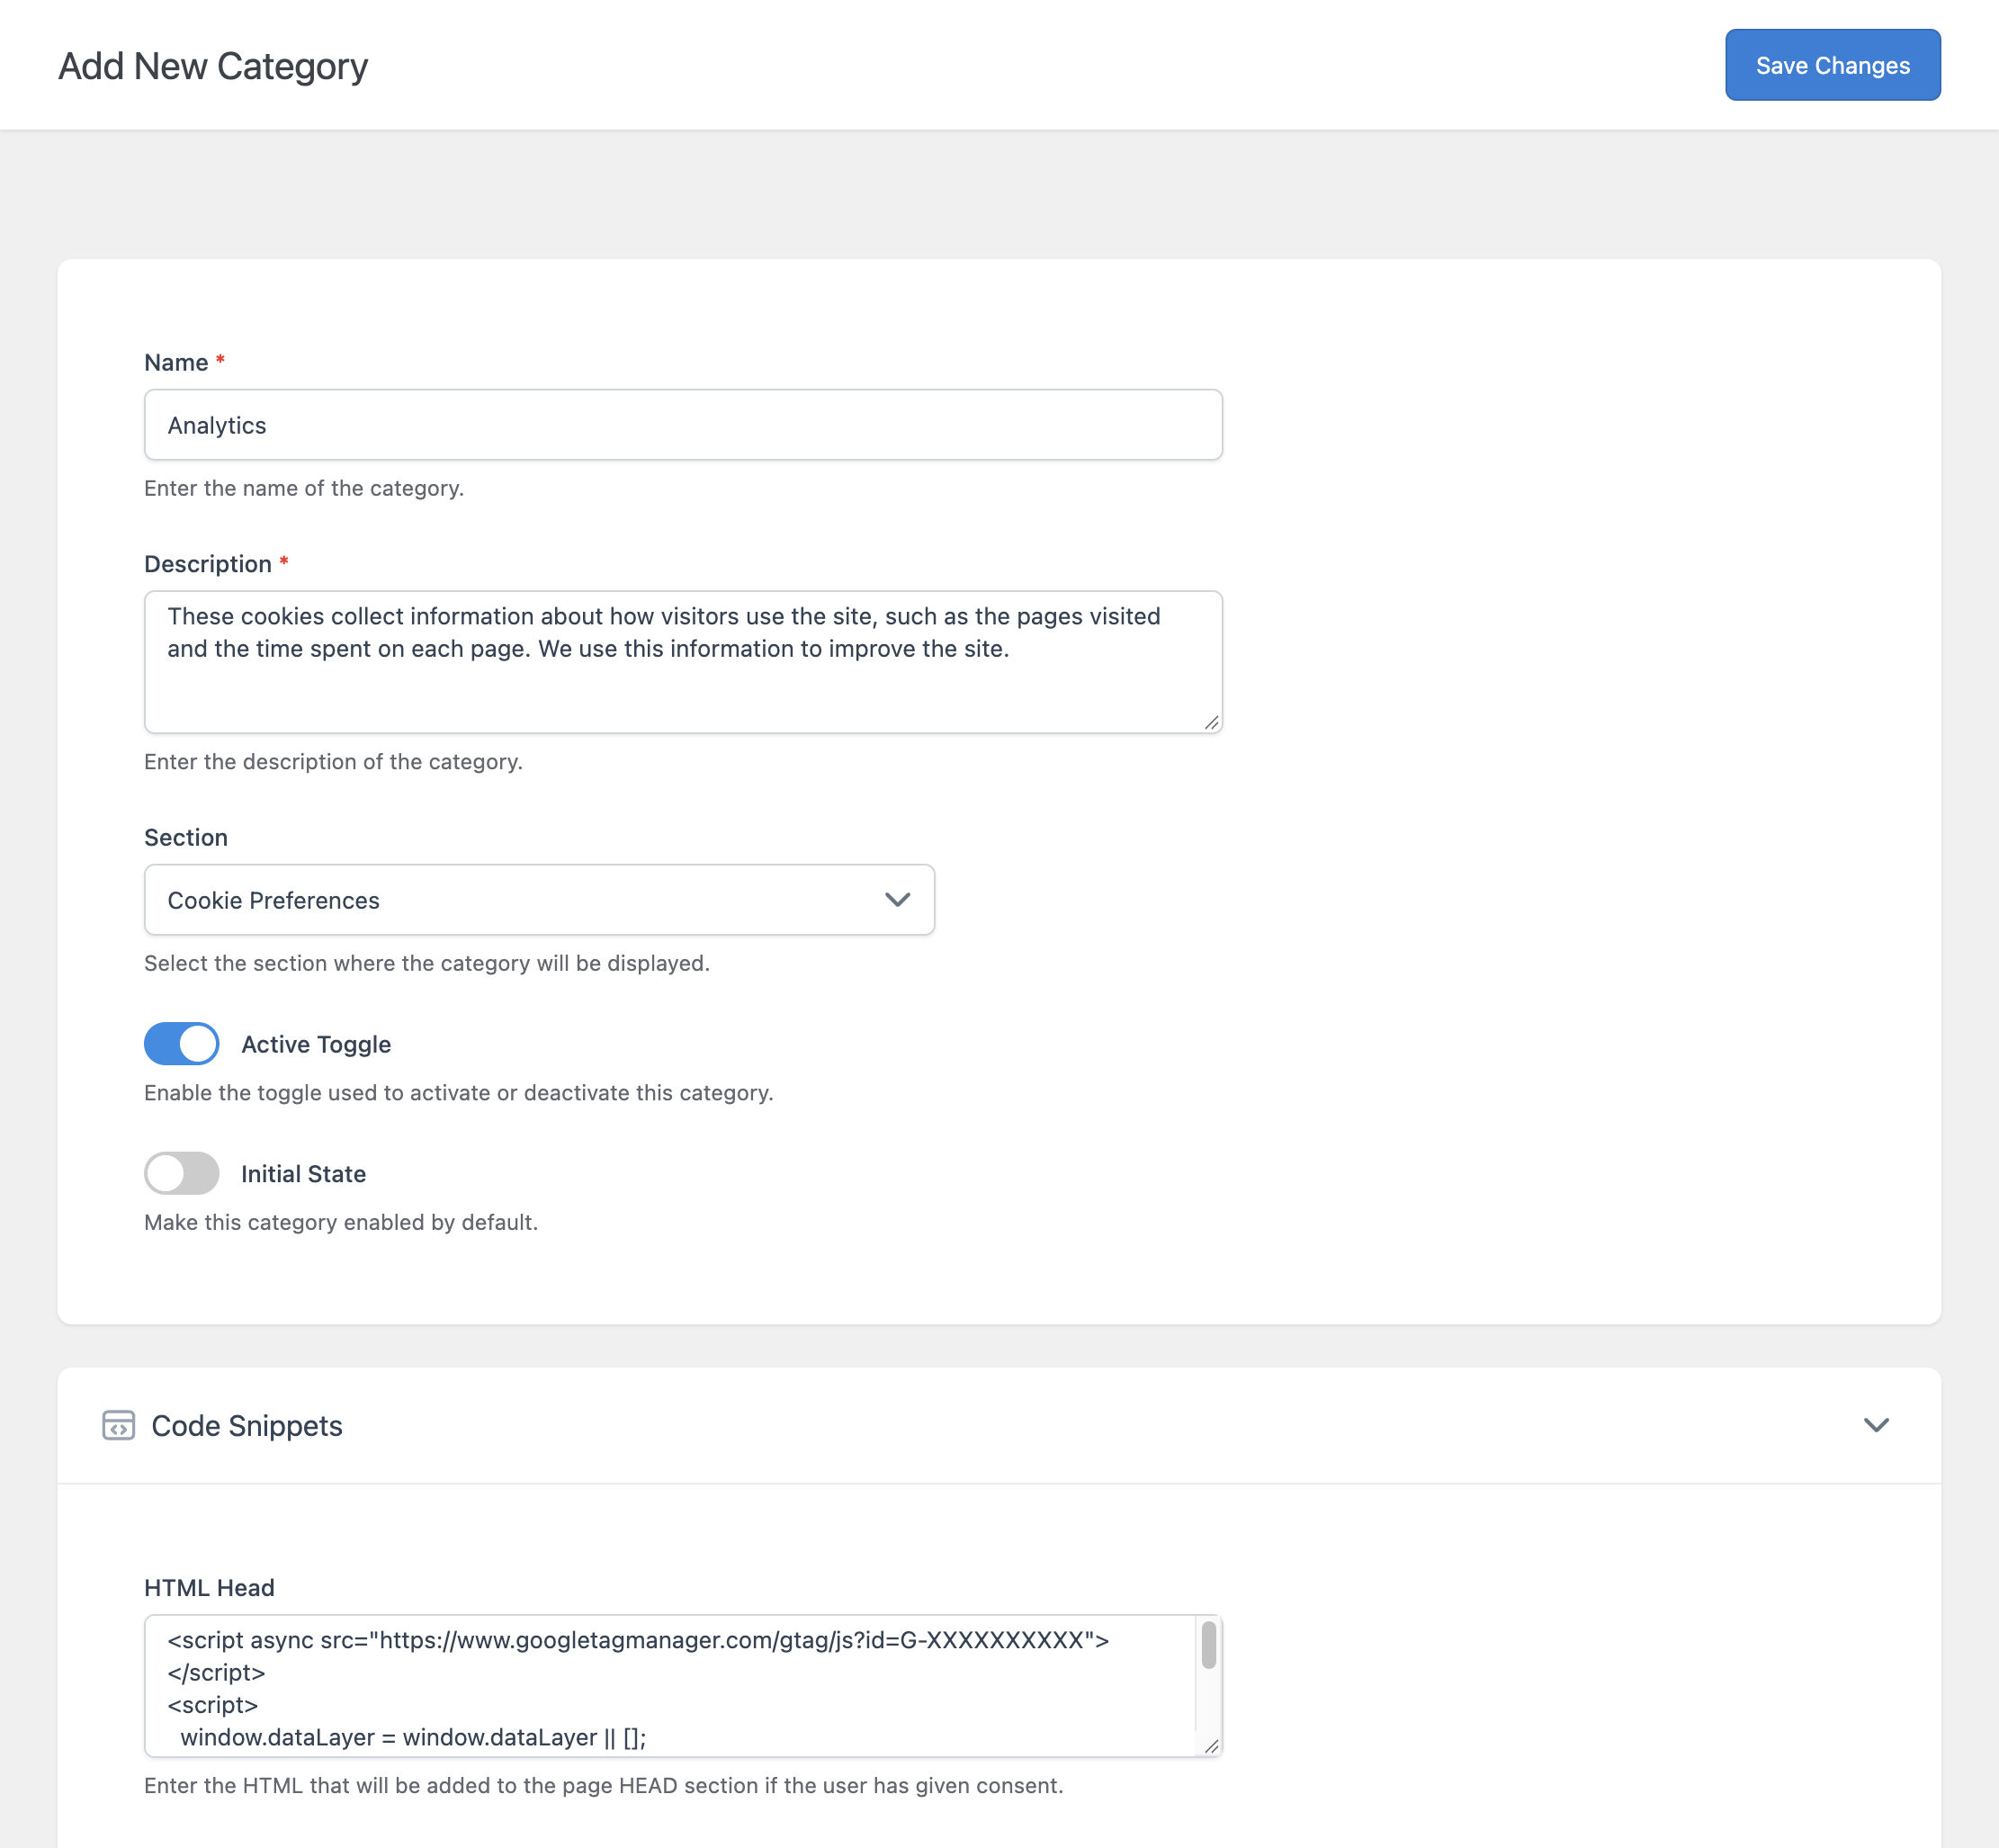
- Click Add New again.
- In Name, enter “Analytics”.
- In Description, explain what these cookies are used for.
- In Section, select the same section.
- Leave Active Toggle on. Visitors can enable or disable this category.
- Turn off Initial State. The category is disabled until the visitor enables it.
- In HTML Head, paste the script of your analytics service, including the
<script>tags. Example for Google Analytics 4 (replaceG-XXXXXXXXXXwith your measurement ID):
<script async src="https://www.googletagmanager.com/gtag/js?id=G-XXXXXXXXXX"></script>
<script>
  window.dataLayer = window.dataLayer || [];
  function gtag(){dataLayer.push(arguments);}
  gtag('js', new Date());
  gtag('config', 'G-XXXXXXXXXX');
</script>- Click Save Changes.
Important: remove the same script from any other place where it is currently added (theme options, another plugin, a page builder). The plugin controls only the scripts entered in the category fields.
Step 4 — Configure the buttons
Go to Cookie Notice → Options → Content and set the buttons of the Cookie Notice section:
| Option | Value |
|---|---|
| Button 1 Text | Settings |
| Button 1 Action | Open Cookie Settings |
| Button 2 Text | Reject |
| Button 2 Action | Reject All Cookies |
| Button 3 Text | Accept |
| Button 3 Action | Accept All Cookies |
Then set the buttons of the Cookie Settings section:
| Option | Value |
|---|---|
| Button 1 Text | Save preferences |
| Button 1 Action | Accept Cookies |
| Button 2 Text | Accept all |
| Button 2 Action | Accept All Cookies |
Click Save settings.
Why Accept All Cookies and not Accept Cookies for the main accept button? Accept Cookies saves the categories as they are currently set. Since the Analytics category has Initial State off, a visitor who clicks a button with the Accept Cookies action without opening the settings would accept only the Necessary category. The difference between the actions is explained in Understanding Button Actions.
Step 5 — Reload the page after acceptance
The scripts of the accepted categories are added when a page is loaded. To add them right after the visitor’s click, without waiting for the next page:
- Open the Advanced tab of the options.
- In the Behavior section, turn on Reload Page.
- Click Save settings.
Step 6 — Test
- Open your site in a private browser window while logged in as administrator.
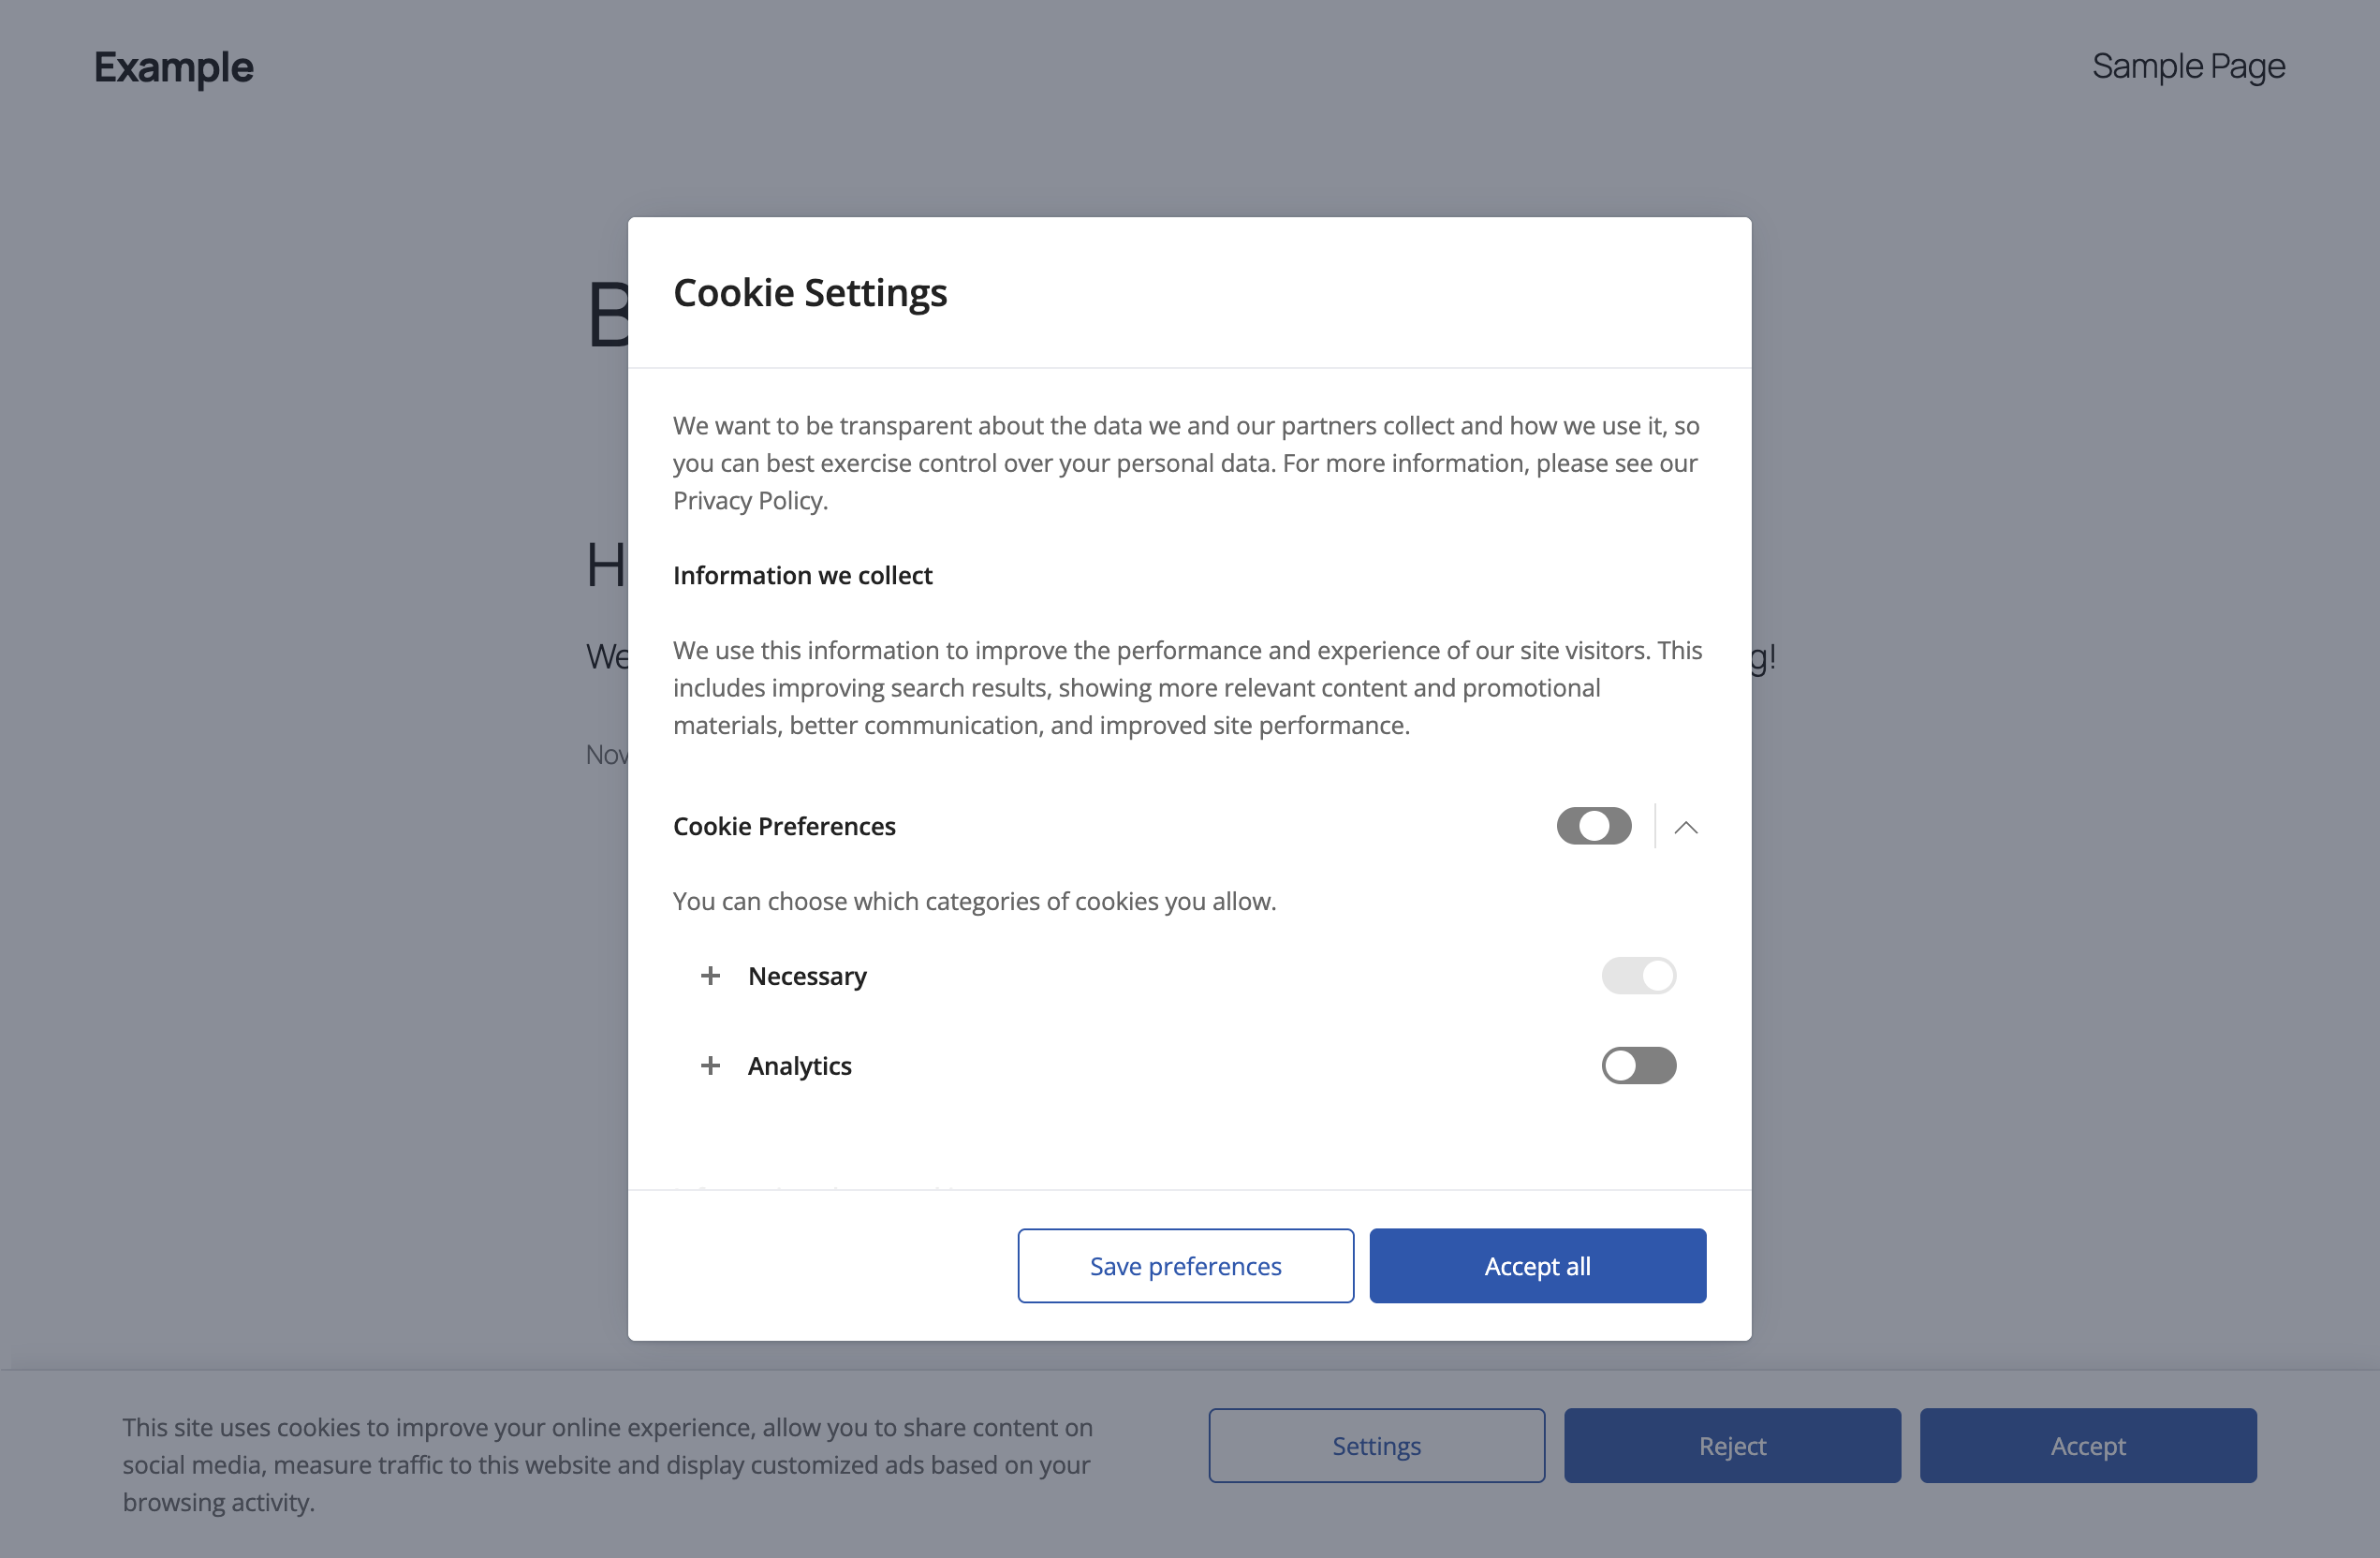
- Click Reject. The notice closes. View the page source and check that the analytics script is not present.
- Click the revisit consent button at the bottom left of the page. The notice is displayed again.
- Click Accept. The page reloads. View the page source and check that the analytics script is present.
- Click the revisit consent button again, click Settings, enable or disable the Analytics toggle, and click Save preferences.
Go to Cookie Notice → Consent Log to see the records created during the test.
When everything works, turn off Test Mode.
If you use a caching plugin
If your site uses a page caching plugin and you added scripts to the categories, read Using the Plugin with Caching Plugins. Some caching plugins need a setting to serve the correct page to visitors who have and have not given consent.
Next steps
- List the cookies of each category: Listing Your Cookies.
- Change colors, fonts, and position: Customizing the Style.
- Display the notice only in selected countries: Showing the Notice Only in Selected Countries.
- Set up Google Consent Mode (Pro): Setting Up Google Consent Mode.