

This article will explain how to create a Gutenberg block that generates the same output of an existing shortcode.
Note that the particular type of block treated in this tutorial is categorized as a Dynamic Block. For this reason, I recommend reading the Creating Dynamic Block article on WordPress.org if you are not familiar with this subject.
Create the shortcode
Start by defining a shortcode and its callback with the add_shortcode() function.
function display_content($params){
    $param1 = esc_html($params['param1']);
    $param2 = intval($params['param2'], 10);
    return "<p>HTML content with <strong>$param1</strong> and <strong>$param2</strong></p>";
}

add_shortcode( 'display-content', 'display_content' );
The defined shortcode generates a paragraph of text with two included parameters. You can invoke this shortcode in the post like this:
[display-content param1="Hello World" param2="10"]
Note that the two shortcode parameters will be supported in our new block as block attributes.
Verify if the block editor is active
We can’t perform all the block-related activities with plugins that disable the block editor or with old WordPress versions. For this reason, we load our initialization script only if the register_block_type() function is available.
if ( function_exists( 'register_block_type' ) ) {
   require_once( plugin_dir_path( __FILE__ ) . 'blocks/src/init.php' );
}
Don’t forget to adapt the path of the initialization file based on your specific situation. In our example, we store the development files in the blocks/src folder.
Enqueue the block assets
We only need to load a single production JavaScript file, which has been generated with the tools present in your block development environment.
Note that two dependencies are also loaded. The wp-blocks dependency gives us the function to register the block, and the wp-element dependency the base component.
function enqueue_editor_assets() {

    wp_enqueue_script(
        'prefix-editor-js',
        plugins_url( '/dist/blocks.build.js', dirname( __FILE__ ) ),
        array( 'wp-blocks', 'wp-element' ),
        false,
        true
    );

}
add_action( 'enqueue_block_editor_assets', 'enqueue_editor_assets' );
Setup the development environment
You can create a development environment for the WordPress block by configuring a module bundler like WebPack or by loading a ready-to-use development environment with your favorite method.
The Development Environment page of the Block Editor Handbook suggests using Docker and the wordpress/create-block npm package.
Create the block
In this section, we will register the block with a JavaScript file written with ESNext features and the JSX syntax.
This file can’t be interpreted directly by the browsers. As a consequence, a reference to this file should be included in your development environment settings.
Import the necessary dependencies
Let’s see which dependencies are required to create this block and the purpose of each dependency:
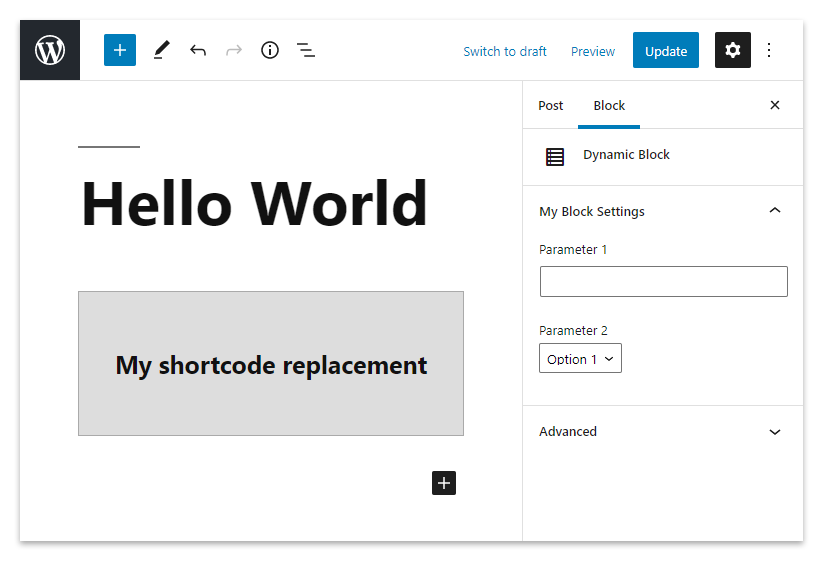
- We use the InspectorControl component to display the block controls in the block inspector. (the section displayed in the right section of the block editor used to configure the block)
- The TextControl and the SelectControl components are used to display the input field and the select box field that we use to collect our parameters.
- The Panel Body and PanelRow components are used to create the body and the rows included in the inspector.
- The registerBlockType allows us to register the block.
- Component is the base component used to define new components.
The dependencies loaded at the beginning of the script:
const {InspectorControls} = wp.blockEditor;
const {TextControl, SelectControl, PanelBody, PanelRow} = wp.components;
const {registerBlockType} = wp.blocks;
const {Component} = wp.element;
Register the block and its attributes
In this section, we will register the block with the registerBlockType() function. The first parameter of this function accepts a unique name for the block. The second parameter receives a JavaScript object with the configuration options.
Important configuration options of our block:
- The
editproperty has a reference to the main block component. - A function that returns
nullis assigned to thesaveproperty. This tells WordPress to save the block data only in the database. - The
attributesproperty is used to define the attributes stored by the block.
registerBlockType('prefix/dynamic-block', {
  title: 'Dynamic Block',
  icon: 'list-view',
  category: 'widgets',
  attributes: {
    param1: {
      type: 'string',
    },
    param2: {
      type: 'string',
    },
  },
  edit: BlockEdit,
  save: function() {
    return null;
  },
});
Create a component for the edit function
This function includes the code used to generate the block, update the components based on the user’s selection, and apply CSS style to the component.
Note that in this example, the styles have been added with JSX inline styles. For more complex components, I recommend you loading a stylesheet file with all the component styles. You can do this with the enqueue_block_editor_assets action, the same action used in the previous section to enqueue the block JavaScript part.
class BlockEdit extends Component {

  constructor(props) {
    super(...arguments);
    this.props = props;
  }

  render() {

    const {attributes: {param1, param2}, setAttributes} = this.props;

    return (
        <div style={{
          backgroundColor: "#ddd",
          border: "1px solid #aaa",
          padding: "20px",
          textAlign: "center"
        }}>
          <h4>My shortcode replacement</h4>
          <InspectorControls>
            <PanelBody title="My Block Settings" initialOpen={ true }>
              <PanelRow>
                <TextControl
                    label="Parameter 1"
                    value={param1}
                    onChange={param1 => setAttributes({param1: param1})}
                />
              </PanelRow>
              <PanelRow>
                <SelectControl
                    label="Parameter 2"
                    value={param2}
                    onChange={param2 => setAttributes({param2: param2})}
                    options={ [
                      { value: '1', label: 'Option 1' },
                      { value: '2', label: 'Option 2' },
                      { value: '3', label: 'Option 3' },
                    ] }
                />
              </PanelRow>
            </PanelBody>
          </InspectorControls>
        </div>
    );

  }

}
Modify the shortcode callback
Since this is a dynamic block, we have to indicate to WordPress which function to run in the front-end to display the block.
You can do this by referencing this function in the render_callback property of the array passed in the second parameter of the register_block_type() function.
function prefix_dynamic_block_render($attributes) {

    if(isset($attributes['param1']) and isset($attributes['param2'])){
        return $display_content(
        array('param1' => $attributes['param1'],
        'param2' => $attributes['param2'])
        );
    }

}

register_block_type( 'prefix/dynamic-block', array(
    'render_callback' => 'prefix_dynamic_block_render',
) );