

With WordPress, meta boxes with date pickers are commonly used with custom post types, for example, to store the date of an event, the release date of a product, the birth date of a person, and more.
This article, which targets both developers and WordPress beginners, will explore different methods to create a meta box with a date picker.
Create a custom plugin
The first part of the tutorial will cover creating a meta box with a date picker with a custom WordPress plugin. However, most of the code available in this tutorial will also work in the functions.php file of a theme.
Define the meta box
The first step is to create the meta box with the add_meta_box() function. This function should be placed inside a callback of the add_meta_boxes hook. If you are new to this subject, check out the Custom Meta Boxes guide for developers on WordPress.org.
The implementation below defines a meta box named “Meta Box with Datepicker” displayed only in the “post” post type.
function add_custom_meta_box() {
	add_meta_box(
		'meta_box_datepicker_example', // Unique ID
		'Meta Box with Datepicker',    // Meta Box title
		'meta_box_datepicker_html',    // Callback function
		'post'                         // The selected post type
	);
}

add_action( 'add_meta_boxes', 'add_custom_meta_box' );
Create the metabox HTML
The meta_box_datepicker_html() callback function referenced in the meta box definition echos the HTML of the meta box fields. Specifically, it generates an input field with its label.
In this context, you will create the date picker by defining an input element of type date. With this particular input field, the browser generates a UI that lets the user select the date.
It’s worth noting that all the major browsers now support this type of date picker. More information on the exact support across browsers is available on this support table.
function meta_box_datepicker_html( $post ) {

	$custom_date = get_post_meta( $post->ID, '_custom_date_meta_key', true );

	?>

	<label for="custom_date">Custom date</label>
	<input name="custom_date" type="date" value="<?php echo esc_attr($custom_date); ?>">

    <?php

}
Your meta box now includes a new field with a date picker.
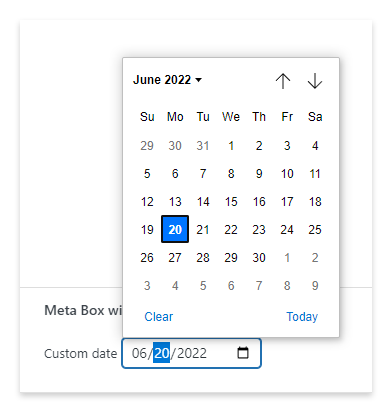
date is rendered by Chrome in your new meta box.Note that the date entered by the user is retrieved with get_post_meta. This meta data will be saved in the save script explained in the next section.
Save the post meta
To save the date entered by the user, you must create a callback function attached to the save_post hook. In this function, simply check the existence of the custom_date key in the $_POST global variable. If this key exists, save its value in a post meta.
function meta_box_datepicker_save( $post_id ) {
   if ( array_key_exists( 'custom_date', $_POST ) ) {
      update_post_meta(
         $post_id,
         '_custom_date_meta_key',
         $_POST['custom_date']
      );
   }
}

add_action( 'save_post', 'meta_box_datepicker_save' );
WordPress can now save the meta box value. Your meta box with the date picker is now fully functional.
Pros and cons of using the browser native date picker
Using the native browser date picker has many advantages:
- There is no need for a dedicated date picker library.
- You load fewer resources and make the page loading faster.
- Date picker variations are available using these alternative attribute values: time, datetime-local, month, and week.
However, there are also problems with this technique:
- The exact aspect and behavior of the UI depend on the browser, and it’s not customizable.
- Older browsers don’t generate the date picker UI.
Considering this, in the next part of the tutorial, you will find how to create a meta box with a date picker using a specialized JavaScript library.
Create the date picker with a JavaScript library
In the following steps, you will use the jQuery UI Datepicker library to convert a regular input field into a date picker. I selected this library because it is popular, included in the WordPress core, and has a lot of options.
Enqueue the jQuery UI Datepicker library styles
As I just said, jQuery UI Datepicker is one of the libraries included in the WordPress core. Consequently, you can load it only by referencing its registration handle.
The script below enqueues a JavaScript file used to initialize the date picker implemented with the jQuery UI Datepicker library. Additionally, it configures jquery and jquery-ui-datepicker as dependencies.
function enqueue_admin_scripts() {

	wp_enqueue_script( 'jquery-ui-datepicker-init',
		plugins_url( 'jquery-ui-datepicker-init.js', __FILE__ ),
		array( 'jquery', 'jquery-ui-datepicker' ),
		'1.00' );

}
Add the jQuery UI Datepicker CSS file
Unlike the JavaScript part, the CSS used to style the jQuery UI Datepicker are not included in the WordPress core. Consequently, you must reference a style file stored in a custom location.
In this example, you will use a file made available by Google Hosted Library.
function enqueue_admin_styles() {

	wp_enqueue_style( 'jquery-ui',
		'https://ajax.googleapis.com/ajax/libs/jqueryui/1.12.1/themes/smoothness/jquery-ui.css',
		array(),
		'1.00' );

}
Modify the date picker HTML
The meta_box_datepicker_html() function, used in a previous section to generate a browser native date picker, should now be modified to support the jQuery UI Datepicker library.
Specifically, you have to apply the following changes:
- Set the input type to
text - Add the
idattribute of the input element. You will use this identifier in the date picker initialization to reference this specific input element.
function meta_box_datepicker_html( $post ) {

	$custom_date = get_post_meta( $post->ID, '_custom_date_meta_key', true );

	?>
	<label for="custom_date">Custom date</label>
	<input id="datepicker" name="custom_date" type="text" value="<?php echo esc_attr( $custom_date ); ?>">
	<?php

}
Initialize the jQuery UI Datepicker
Here you initialize the date picker with the datepicker() function as soon as the DOM is fully loaded.
(function($) {

  'use strict';

  $(document).ready(function() {

    'use strict';

    //Basic jQuery UI Datepicker initialization
    $('#datepicker').datepicker();

  });

})(window.jQuery);
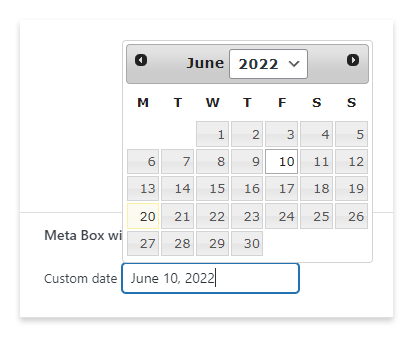
That was the last step of the process. You can now use the date picker in the post editor.
Customizations
Another advantage of using a jQuery UI Datepicker date picker is the ability to customize its exact behavior. The complete list of customization options is available here.
Below you can find a list of common customization options with practical examples.
Custom date format
Set the yy-mm-dd custom date format.
$('#datepicker').datepicker({
  dateFormat : 'yy-mm-dd'
});
Restrict the date range
The example below restrict the range of dates selectable by the user. The custom range goes from ten days before the current date to one month and ten days after the current date.
$( "#datepicker" ).datepicker({
  minDate: "-10D",
  maxDate: "+1M +10D"
});
Enable the month selector
This customization adds a month selector in the header of the date picker.
$( "#datepicker" ).datepicker({
  changeMonth: true,
});
Enable the year selector
In this example, you add the ability to change the year with a selector available in the header.
$( "#datepicker" ).datepicker({
  changeYear: true
});
Use existing plugins
I tested the two most popular meta box plugins, Meta Box and Advanced Custom Fields. These plugins solve the same problem with two different approaches. Let’s see in detail how these two products work and which is the best solution for you.
Meta box
Meta Box is a popular WordPress plugin that simplifies the implementation of meta boxes with code. Specifically, it achieves this by adding a custom meta box framework and an online code generator.
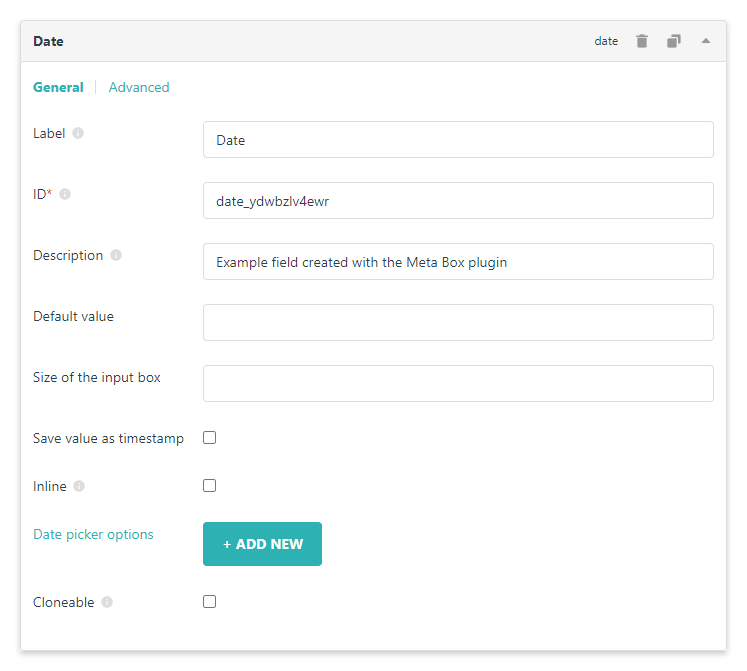
To create a meta box with a date picker with this plugin, proceed as follows:
- Visit the online generator page
- Open the Advanced section
- Select “Date” or “Date Time” (for a date picker with a time selector) based on your needs
- Click the Generate Code button
After this procedure, the plugin generates this code for you:
add_filter( 'rwmb_meta_boxes', 'your_prefix_register_meta_boxes' );

function your_prefix_register_meta_boxes( $meta_boxes ) {
	$prefix = '';

	$meta_boxes[] = [
		'title'   => esc_html__( 'Untitled Field Group', 'online-generator' ),
		'id'      => 'untitled',
		'context' => 'normal',
		'fields'  => [
			[
				'type' => 'date',
				'name' => esc_html__( 'Date', 'online-generator' ),
				'id'   => $prefix . 'date_476xkcodtpj',
			],
		],
	];

	return $meta_boxes;
}
Add this code to your plugin to generate the meta box with the date picker. No additional steps are required.
Advanced Custom Fields
This Advanced Custom Fields plugin, also known as ACF, provides an easy-to-use interface where you can create and group an unlimited number of meta boxes.
From the Field Groups menu of ACF, first, create a group. ACF uses groups to categorize the meta box fields you make. Additionally, you can use groups to activate a meta box conditionally. For example, based on the post type, post template, the logged user, a more.
Then create a field, and configure “Date Picker” or “Date Time Picker” with the Type selector. When you are ready, click Update to finalize the meta box.
