In this article, we are going to add a text-to-speech button in all the WordPress articles using the Web Speech API and standard WordPress hooks. At the end of the article, a solution that involves using an existing text-to-speech plugin will also be covered.
Advantages of the Web Speech API
The Web Speech API allows you to convert text to speech directly using the browser. It’s free and easy to use.
The Web Speech API interfaces used in our example, SpeechSynthesis, and SpeechSynthesisUterrance, are also well supported by all major web browsers. This means that you can confidently use these APIs in any production application.
Add the text-to-speech Button in the Post With the Proper Hooks
Using the the_content hook, we can include the HTML of the text-to-speech button at the beginning of the post. This is where text-to-speech players are usually positioned.
//Add the button HTML at the end of the post content
add_filter( 'the_content', 'add_content_before');

function add_content_before($content){

    //Put the content to speech in a javascript variable
    $script = '<script>var ss_player_content = ' . json_encode($content) . ';</script>';

    //Generate the button
    $play_button = '<button class="ss-button" id="ss-play-content" data-post-id="' . get_the_ID() . '">Play Content</button>';

    return $script . $play_button . $content;

}
The script above does what follows:
- It stores the post content in a JavaScript variable. The JavaScript part will use this variable to retrieve the content.
- It adds to the HTML of the post a “Play” button. The visitors will be able to play the spoken version of the post by clicking on this button.
To conclude, enqueue a JavaScript file that will be used to create and player the spoken version of the post:
//Load public js
add_action( 'wp_enqueue_scripts', 'enqueue_scripts' );

function enqueue_scripts()
{

    wp_enqueue_script('ss-player',
        plugin_dir_url( __FILE__ ) . 'ss-player.js',
        array('jquery'),
        '1.00', true);

}
At this point, clicking the “Play” button will not produce results. In the next section, we’ll be creating the JavaScript implementation.
Perform the Conversion With the Web Speech API
The Web Speech API allows web developers to integrate text-to-speech functionality into their web applications. This API enables you to convert text into spoken words, making web content more accessible to users with visual impairments or for various other use cases where audio output is preferred.
Now, let’s create a function that plays the given strings using the SpeechSynthesis and SpeechSynthesisUterrance interfaces.
function speak(phrase) {

    // Create a new SpeechSynthesisUtterance object
    const utterance = new SpeechSynthesisUtterance();

    // Set the text to be spoken
    utterance.text = phrase;

    // Use the default speech synthesis voice
    const voices = speechSynthesis.getVoices();
    utterance.voice = voices[0]; // You can change the index to use a different voice

    // Speak the phrase
    speechSynthesis.speak(utterance);

}
This function does what follows:
- Creates a new SpeechSynthesis utterance. This interface represents the speech synthesis request, including the text to be spoken, voice selection, pitch, rate, and more.
- Sets the text to be spoken using the text property of the utterance.
- Using again the utterance interface, the script configures a voice from the available voices. Specifically, the voice with index 0 is the voice of an adult male.
- It speaks the phrase using the
speak()method.
The final step in the process is to handle the clicks on the play button and alternatively speak the post content when speechSynthesis is available in the browser or print a message when speechSynthesis is not available in the browser (for example, with old browser versions).
//handle click event listener with pure javascript
document.getElementById('ss-play-content').addEventListener('click', function() {

    'use strict';

    const phrase = window.ss_player_content;

    if ('speechSynthesis' in window) {

        // Usage example:
        speak(phrase);

    } else {
        console.log("SpeechSynthesis API is not supported in this browser");
    }

});
Clean the Post Content
The current implementation speaks the entire HTML of the content. This means that when, for example, paragraph opening and closing tags are encountered, the letter “p” is pronounced. When shortcode tags are encountered, the shortcode name is pronounced, etc.
We clearly don’t want that. As a consequence, we remove all the tags and shortcodes:
function add_content_before_enhanced($content){

    $cleaned_content = strip_shortcodes($content);
    $cleaned_content = wp_strip_all_tags($cleaned_content, true);

    //Put the content to speech in a javascript variable
    $script = '<script>var ss_player_content = ' . json_encode($cleaned_content) . ';</script>';

    //Generate the button
    $play_button = '<button class="ss-button" id="ss-play-content" data-post-id="' . get_the_ID() . '">Play Content</button>';

    return $script . $play_button . $content;

}
For a real-world implementation, consider replacing specific characters or strings with their speakable counterparts. For example, you might want to replace the > html entity with the “greater than” string, the < HTML entity with the “less than” string, etc.
In general, you should decide which elements you want to remove based on the specific website needs and after testing your custom text-to-speech implementation with articles of your website.
Create Your Custom Player
You can build your custom audio player by creating custom HTML elements and by using dedicated SpeechSynthesis methods in the events callbacks:
pause()– It pauses the SpeechSynthesis object.resume()– It resumes a paused SpeechSynthesis object.speak()– It adds the utterance, and then the configured text is spoken.
This implementation requires experience with JavaScript, HTML, and CSS. In general, the steps to perform this process are:
- Create a player using HTML and CSS.
- Create event listeners for the clicks on the controls of the custom audio player, specifically the play and pause buttons.
- Run the methods of the
SpeechSynthesisinterface in the callback of the event listeners.
In this basic example, the pause() method is used to pause an utterance being spoken:
const ss = window.speechSynthesis;

const utterance1 = new SpeechSynthesisUtterance("Hello world.");

//Speak the utterance
ss.speak(utterance1);

//Pause the utterance
ss.pause();
Using the Web Speech API with WordPress using an existing plugin
There are many text-to-speech plugins for WordPress. One plugin that uses the Web Speech API is Real Voice.
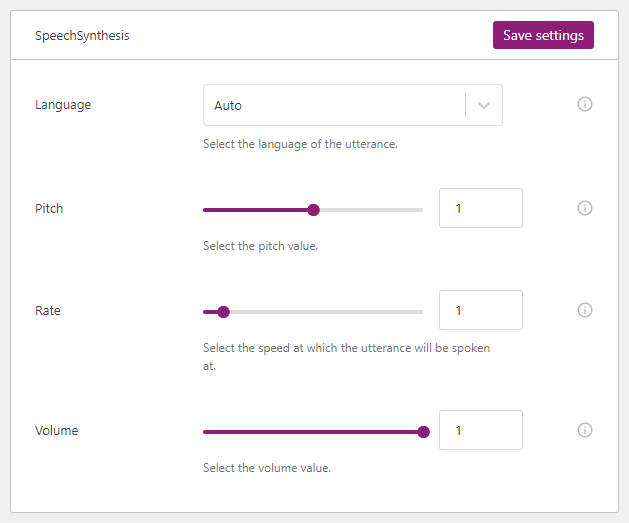
The settings of this plugin have customization options that reflect the Web Speech API options. Specifically, you can set voice language, voice pitch, voice speed, and voice volume.

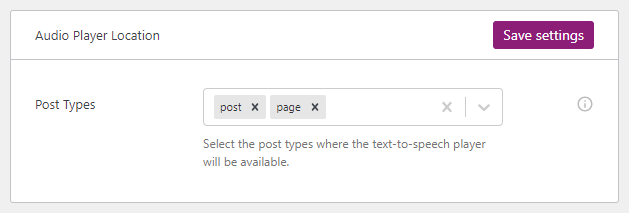
The plugin also allows you to configure to which post type the TTS player should be added. For example, if you want to add the text-to-speech button only on your blog articles, select “post” from the Post Type option.

Alternatives to the Web Speech API
SpeechSynthesis allows you to perform conversions directly in the browser without using external API. However, for better quality in the speech, support for SSML, and more customization options, consider dedicated text-to-speech services available on the web.
Text-to-speech from major web companies are:
There are also many other alternatives from standard companies that are usually easier to use.
I have recently tried ElevenLabs, a text-to-speech service with impressive AI-based voices. It requires just a simple API call using the provided token to convert any text string to an audio file. See the ElevenLabs API Documentation for more information.
Note that compared to the Web Speech API, the disadvantage of these services is that they have a cost, usually per converted character.
