

This article explores five ways to receive user feedback on WordPress articles, including plugin-based methods and programmatic solutions.
Why You Should Collect Feedback on Your Articles
With feedback, you can understand what your visitors like and don’t like about your articles and apply the proper improvements.
Methods to Receive Feedback on Your Articles
You can receive feedback on your articles using forms generated by a plugin or implemented programmatically. For a small blog, you might also consider simply including contact information in the article.
Let’s see some of the possible implementation methods in detail in the following sections.
Method 1 – Using a Specialized Article Feedback Plugin
Article feedback plugins integrate a quick survey at the end of your articles. Currently, a limited number of specialized article feedback plugins are available in the WordPress repository.
Helpful, for example, is a plugin created by our web agency that collects user feedback when the users click on textual buttons or icons placed at the end of the article.
Let’s see how to install and use this plugin on your WordPress site.
First, install the Helpful plugin from your plugins menu. The free version of Helpful is available on WordPress.org.
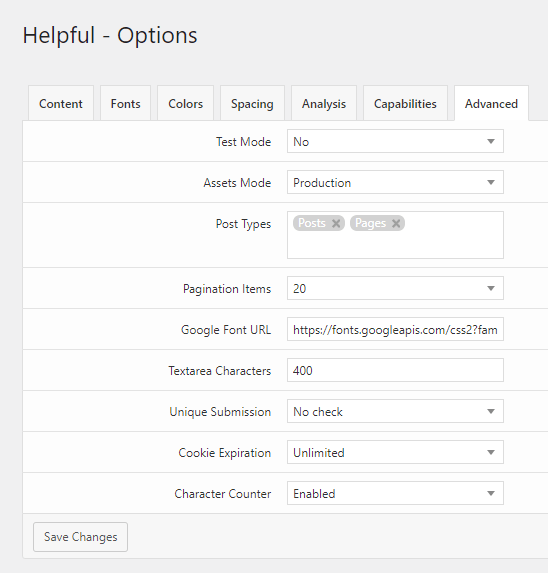
Once the plugin is installed, proceed to the Advanced tab of the options and select on which post types you want to include the article feedback form. If, for example, you want to add the form only on your posts and not on your pages, here select “posts”.
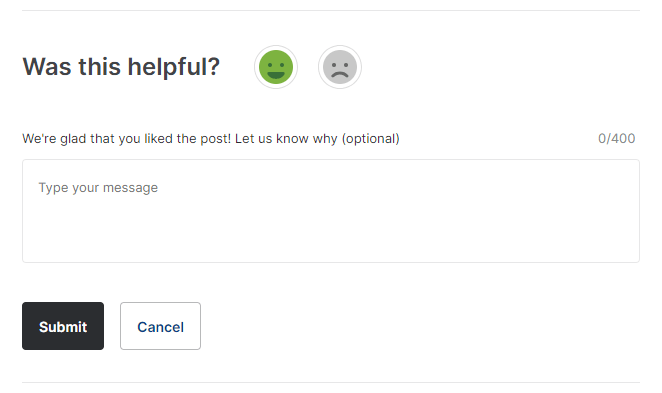
Now, visit the front end of your site. Here, you can verify the presence of the feedback form and perform a submission for testing purposes.
You can check the feedback you received at any time from a dedicated plugin menu named Statistics. Here, you can quickly find your best-performing articles (the articles with the highest percentage of positive feedback) and your worst-performing articles (the articles with the lowest percentage of positive feedback). The latter category is the one you should focus on to apply improvement.
Note that data export functionalities are available only in the Pro version. Here, you will find cumulative export, itemized export, and other additional features.
Method 2 – Create a Survey With a Form Builder
While this method can be applied with multiple form plugins, in this tutorial, I’ll be using WPForms.
Start by installing WPForms, the versatile and popular (more than 300.000 active users) form builder for WordPress. You can find it in the repository just by searching “WPForms”.
Now, we should create a custom form specific for receiving article feedback.
Visit the WPForms → Add New menu. Here, you will find hundreds of form templates to select from.
For this specific purpose, I can’t find an appropriate template from the list, so I’m going to create a new one from the provided Blank Form.
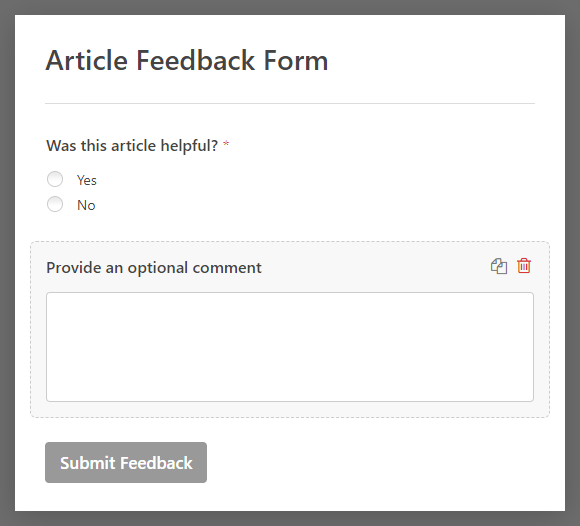
First, visit the General tab of the form and assign “Article Feedback Form” as its name. This allows us to find this form easily in the future.
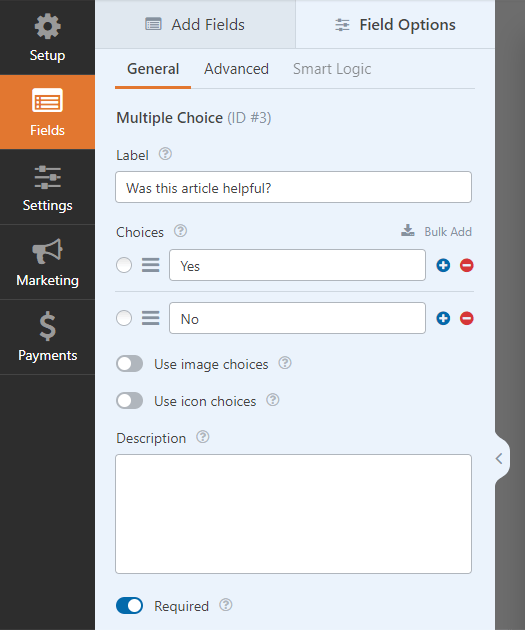
The first element of the form is a Multiple Choice field. This is the field used to collect the “Yes” or “No” binary feedback. Assing the “Was this article helpful?” text to the Label field and keep only two choices.
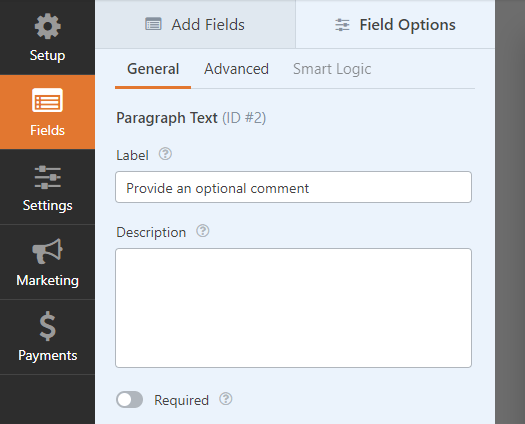
The second element is a textarea used to collect optional textual feedback from the visitor. With WPForms this field type is named Paragraph Text. Add this element to the form and change its label to “Provide an optional feedback”
To conclude, set the main form button label to “Submit Feedback”.
Once you have the feedback form, create an article and add the form by clicking on the WPForms block. Then select “Article Feedback form”

Note that this simple form doesn’t store the feedback in the WordPress database. Instead, you will receive the feedback information in the configured email.
Method 3 – Use a Survey Plugin
If you are searching for a more complex solution, consider using a full-featured survey plugin like Quiz and Survey Master.
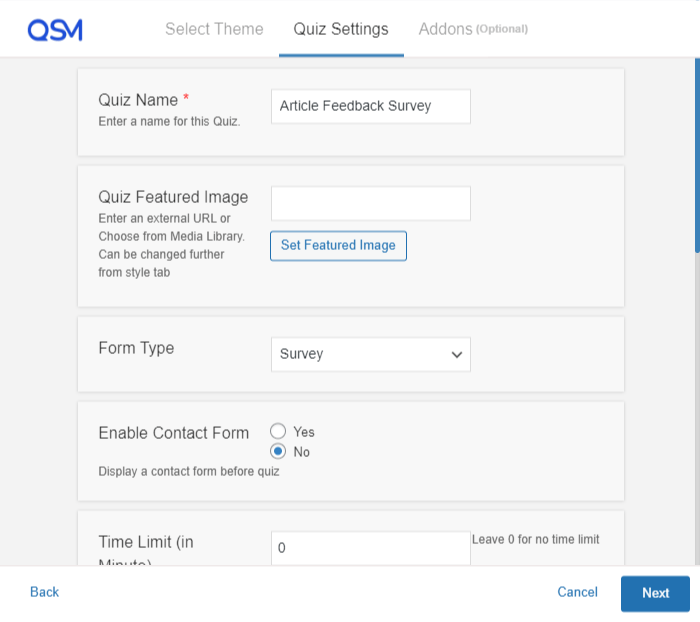
With the QSM plugin, select Quizzes & Surveys. In the Quiz Setting tab, select “Survey” as the form type and set “Article Feedback Survey” as the quiz name. Then, create the quiz.
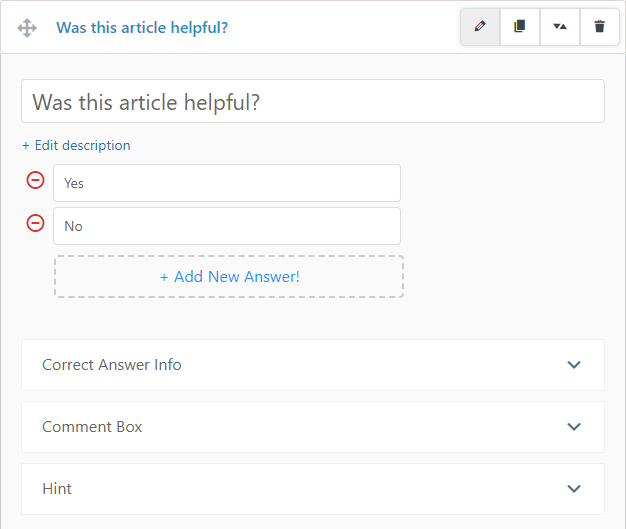
In the “Questions” tab, add the question “Was this article helpful?” and the related “Yes” and “No” answers.
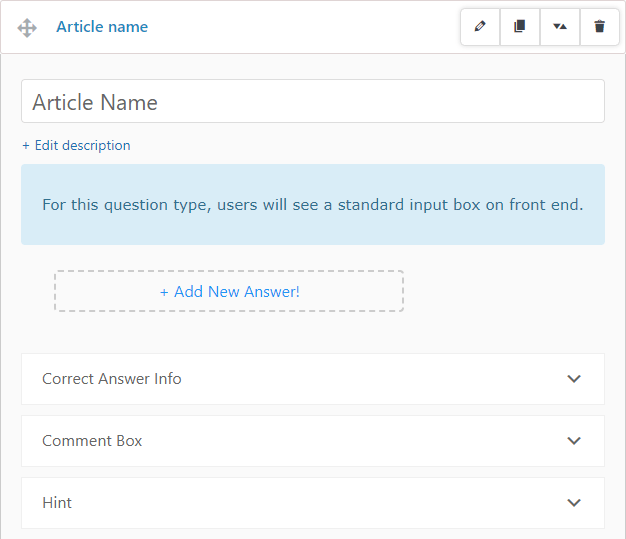
Then add the “Article Name” short answer. This field allows the user to specify for which article he is submitting the feedback.
Then, publish the quiz.
In the QSM → Quizzes & Surveys menu, get the shortcode link to the quiz page by clicking under the shortcode column.
Then, proceed to your article and include with the QSM Block the survey you just created. Users can now access to the survey by clicking the link at the end of the articles.

In the QSM → results page, you can verify the results of your survey at any time.
Method 4 – Add Contact Information in the Article
For blogs with a limited number of users, you might consider adding your email address or link to your social profile at the end of the article. Here, you can also specify the reason why you are requesting feedback, for example, to keep the quality high.
Technically, you can add your email address and an additional message at the end of your post with the following methods:
- By editing the WordPress template file used to display the article. For this, the use of a child theme is recommended.
- By programmatically adding custom HTML using a WordPress hook in a custom plugin or a functions.php file.
- By manually adding a synced pattern at the end of the article from the post editor.
Method 5 – Add a Feedback Form in Your Article Programmatically
If you are a web developer looking for an optimized and lightweight solution, a custom implementation of the feedback form for your article may be a good solution.
To add custom HTML at the end of an article, you can use the the_content filter. In the example below, I added a feedback form using this filter.
You might also take a look at our tutorial on creating a contact form in WordPress. Here, you can find more details on how you can programmatically integrate forms in the front end of WordPress and properly validate and sanitize the submitted data.
// Add the feedback form at the end of the post content.
add_filter( 'the_content', 'add_article_feedback_form' );
The form can be processed using a few PHP lines. More precisely, below, the form data are first sanitized and then used to compose the email for the site administrator.
function add_article_feedback_form( $content ) {

	if ( isset( $_POST['submit'] ) ) {

		// Sanitize the form input.
		$nonce   = isset( $_POST['article_feedback_nonce'] )
			? sanitize_text_field( $_POST['article_feedback_nonce'] ) : null;
		$like    = isset( $_POST['like'] )
			? sanitize_text_field( $_POST['like'] ) : null;
		$comment = isset( $_POST['comment'] )
			? sanitize_text_field( $_POST['comment'] ) : null;

		// Verify the nonce field.
		if ( ! wp_verify_nonce( $nonce, 'article_feedback_form' ) ) {
			exit( 'Invalid nonce' );
		}

		/**
		 * Send email that include the submitted form data to the website
		 * adminstrator (admin@example.com) using wp_mail().
		 */
		$subject = $like == 'yes' ? 'Positive Feedback' : 'Negative Feedback';
		wp_mail(
			get_option( 'admin_email' ),
			$subject,
			$comment );

		$form = '<p>Thank you. Your feedback has been submitted.</p>';

	} else {

		// Add a contact form HTML in the $form variable.
		$form = '<div class="feedback-form">
        <h3>Feedback</h3>
        <form action="" method="POST">

        <!-- A nonce field that will be used to verify the form submission -->
        <input type="hidden" name="article_feedback_nonce" value="'
		        . wp_create_nonce( 'article_feedback_form' ) . '" />

        <!-- Radio buttons for two values: Yes and No. -->
        <p>Do you like this post?</p>
        <input type="radio" name="like" value="yes" /> Yes
        <input type="radio" name="like" value="no" /> No

        <!-- Textarea where the user can leave an optional comment. -->
        <p>Leave an optional comment</p>
        <textarea name="comment"></textarea>


        <!-- Add a hidden field with the post ID -->
            <input type="submit" name="submit" value="Submit" />
        </form>
    </div>';

	}

	return $content . $form;

}
The code above generates a form by adding custom HTML to the post content using the the_content filter.
Specifically, if the feedback still needs to be submitted, the article feedback form is added to the post content. If the post has already been submitted, the form data are sanitized and used as the subject and body of the email sent to the website administrator. In this case, in the post content, the confirmation message “Thank you. Your feedback has been submitted.” is displayed.
Possible improvements
Note that this simple implementation doesn’t consider features like preventing multiple submissions, using a captcha, collecting the received data in a database table, etc. For this, consider an existing plugin or augment this basic implementation.
If you are considering collecting the feedback data in a custom database table, see the wpdb class.
Want to display the feedback received in a back-end menu of WordPress? Just create a dedicated menu and display these data by querying the database. For more information, see the WordPress menu user guide.